Supported Devices
Generation 1
Fully SupportedRequires device teardown
Generation 2
Fully SupportedSimple USB connection
Generation 3
In DevelopmentNot currently supported
Both Generation 1 and Generation 2 thermostats are fully supported.Gen 2 devices are easier to flash (simple USB connection), while Gen 1 requires device disassembly and contact bridging to enter DFU mode.
How to Identify Your Nest Thermostat
Not sure which generation you have? Use this guide to identify your Nest Thermostat model.Visual Identification
Here’s what each generation looks like:Generation 1
Key Features:
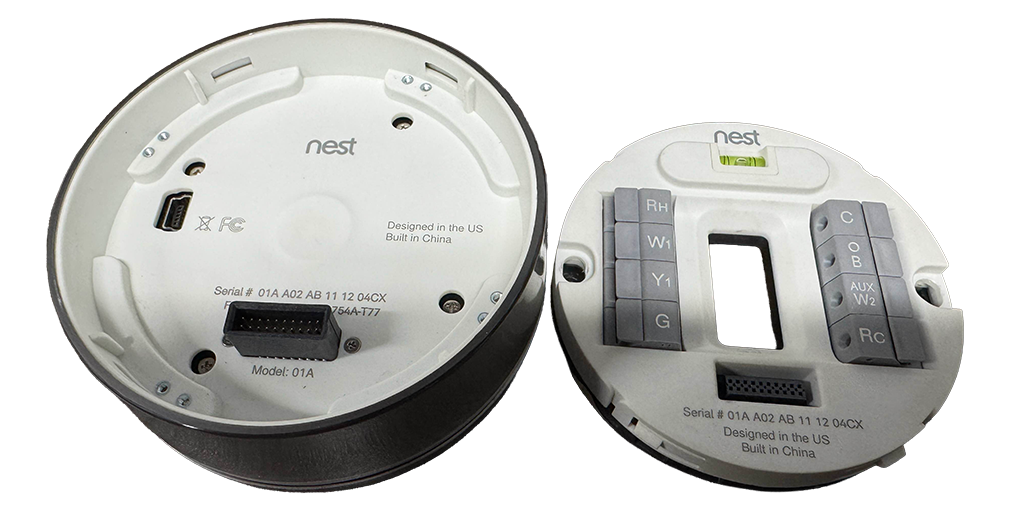
- Rotating ring with metallic finish
- 8 wire connectors on backplate
- Yellow/Green level bubble
Generation 2
Key Features:
- Similar rotating ring design
- 8-10 wire connectors on backplate
- Yellow/Green level bubble
Generation 1 Thermostat
Generation 2 Thermostat

Method 1: Check the Backplate
Remove your Nest from the wall mount and look at the backplate for these identifying features:Level Bubble Color
Yellow/Green → Gen 1 or Gen 2 ✅Blue → Gen 3 ❌
Wire Connectors
8 connectors → Gen 1 ✅8-10 connectors → Gen 2 ✅10 connectors → Gen 3 ❌
Method 2: Check Settings Menu
This is the most reliable method:Wondering why No Longer Evil exists? Learn about how Google is intentionally blocking older Nest devices even though they’re fully functional.
Generation-Specific Installation Requirements
Generation 1 - Requires Teardown
Generation 1 - Requires Teardown
Gen 1 thermostats are fully supported but require device disassembly to enter DFU mode.You’ll need:
- Phillips screwdriver or similar tool
- Metal tweezers or similar conductive object
- Patience for careful disassembly
Generation 2 - Simple USB Connection
Generation 2 - Simple USB Connection
Gen 2 thermostats are the easiest to flash - just connect via USB and run the installer.You’ll need:
- Micro USB cable
- No disassembly required
Additional Requirements
Beyond having a Generation 1 or Generation 2 thermostat, you’ll need:Computer
Operating System: Linux (recommended) or macOSPurpose: To run the firmware installer⚠️ Windows is NOT supported (including WSL)
USB Cable
Type: Mini USB (Gen 1) or Micro USB (Gen 2)Purpose: Connect thermostat to computer for firmware flashing
Charged Battery
Level: At least 50% chargePurpose: Ensure device stays powered during flashing
Internet Connection
Speed: Standard broadbandPurpose: Download firmware & access dashboard
Next Steps
Choose Your Path
Decide between hosted service (easy) or self-hosted (advanced)
Get Started
Jump straight to the recommended hosted setup guide