> ## Documentation Index
> Fetch the complete documentation index at: https://docs.nolongerevil.com/llms.txt
> Use this file to discover all available pages before exploring further.
# Self-Hosted Installation Guide
> Complete guide to setting up your own No Longer Evil infrastructure
**Before you begin:**
* Ensure you have a **Nest Generation 1 or Generation 2** thermostat ([check compatibility](/compatibility))
* This is for **advanced users** comfortable with command line, Docker, and networking
* You'll need a **server that can run 24/7** (Raspberry Pi, NAS, VPS, etc.)
* **Gen 1 requires device teardown** - only proceed if comfortable with electronics disassembly
## Overview
The self-hosted path has two parts:
1. **Set up your NLE server** — pull and run the pre-built Docker image on any always-on machine
2. **Flash your thermostat** — run the same GUI installer as the hosted path, then select "Self-Hosted" in the wizard
***
## Part 1: Set Up Your NLE Server
Choose the deployment option that matches your setup:
### Option A — Home Assistant Add-on
**Requirements:**
* **Home Assistant OS** — does NOT work with Home Assistant Container (bare Docker HA)
* **Mosquitto broker add-on** must be installed for MQTT/climate entity discovery
**Step-by-step:**
1. **Add the repository to Home Assistant:**
 Or manually: Settings → Add-ons → Add-on Store → three-dot menu → Repositories → paste:
```
https://github.com/codykociemba/NoLongerEvil-HomeAssistant
```
2. **Find NoLongerEvil HomeAssistant in the Add-on Store and click** Install
3. **⚠️ Before starting: configure `api_origin` first** — Go to the **Configuration** tab of the add-on. Change `api_origin` from the default to your Home Assistant machine's actual LAN IP address (e.g. `http://192.168.1.100:9543` — replace `192.168.1.100` with your HA machine's IP)
Or manually: Settings → Add-ons → Add-on Store → three-dot menu → Repositories → paste:
```
https://github.com/codykociemba/NoLongerEvil-HomeAssistant
```
2. **Find NoLongerEvil HomeAssistant in the Add-on Store and click** Install
3. **⚠️ Before starting: configure `api_origin` first** — Go to the **Configuration** tab of the add-on. Change `api_origin` from the default to your Home Assistant machine's actual LAN IP address (e.g. `http://192.168.1.100:9543` — replace `192.168.1.100` with your HA machine's IP)
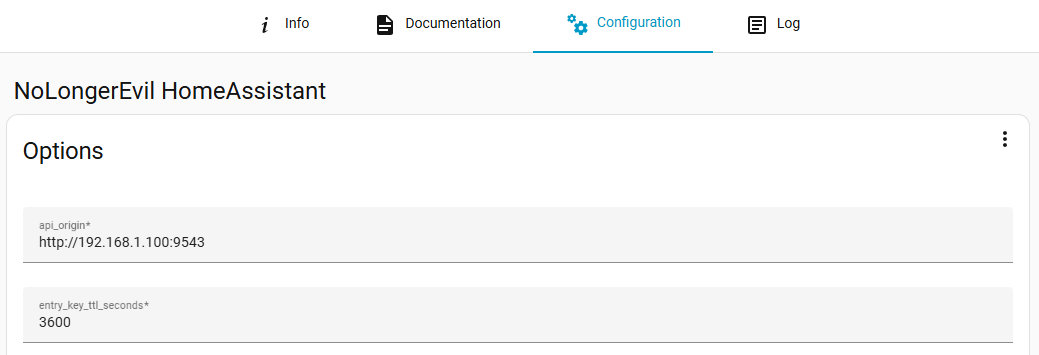 **`api_origin` must be set before starting.**
The default value (`http://homeassistant.local:9543`) uses mDNS, which Nest devices cannot reliably resolve. If you start the add-on before setting a real IP, the thermostat will fail to connect.
**Do not skip this step.**
4. Click Save, then go to the **Info** tab at the top and click Start
5. Enable **Start on boot** and **Watchdog** (auto-restart on crash)
6. (Optional) Enable **Auto update** and **Show in sidebar** for easy dashboard access
Your NLE server is now running. Continue to [Part 2](#part-2:-flash-and-configure-via-gui-installer) below to flash your thermostat and connect it to your server.
| Port | Purpose |
| ---------------------------------- | ------------------------------------------------------------------------ |
| `9543` (host) → `8000` (container) | Nest device communication — this is what you enter as the server address |
| `8082` | Control API + Web UI (Ingress/sidebar only by default) |
You do not need to configure these ports for a standard local setup — the add-on handles this automatically.
To expose the dashboard directly (e.g., `http://[HA-IP]:8082`): Settings → Add-ons → No Longer Evil → Configuration → Network → assign a host port to container port `8082`.
**Security risk:** Exposing port 8082 directly gives unauthenticated access to the NLE dashboard. If your Home Assistant instance is accessible from outside your network, do not expose this port unless you fully understand the risks and have additional access controls in place.
**When the GUI installer runs for an HA add-on user:**
* The installer scans the LAN for a running NLE server via the `/info` endpoint
* It will detect the add-on at port `9543`
* Select **Self-Hosted** in the wizard and confirm the detected address (`http://[HA-IP]:9543`)
***
### Option B — Standalone Docker
```bash theme={null}
docker run -d \
-p 8000:8000 \
-p 8082:8082 \
--name nolongerevil-server \
-e API_ORIGIN=http://YOUR_LAN_IP:8000 \
-v nolongerevil-data:/data \
ghcr.io/codykociemba/nolongerevil-selfhosted:latest
```
**`API_ORIGIN` must be your machine's LAN IP** (e.g., `http://192.168.1.50:8000`), not `localhost` or a hostname. The thermostat connects back to this address. The GUI installer reads it from the server's `/info` endpoint during setup.
Verify it's running:
```bash theme={null}
docker ps | grep nolongerevil
curl http://localhost:8082/health
```
Your NLE server is now running. Continue to [Part 2](#part-2:-flash-and-configure-via-gui-installer) below to flash your thermostat.
***
### Option C — Docker Compose
```bash theme={null}
git clone https://github.com/codykociemba/NoLongerEvil-SelfHosted.git
cd NoLongerEvil-SelfHosted
```
Edit `docker-compose.yml` — set `API_ORIGIN` to your LAN IP, then:
```bash theme={null}
docker compose up -d
```
**Full environment variable reference:**
| Variable | Required | Default | Description |
| ------------------------------ | -------- | --------------------------- | ----------------------------------------------------------------------------------------------------- |
| `API_ORIGIN` | ✅ Yes | `http://localhost` | LAN IP:port devices connect to (e.g., `http://192.168.1.50:8000`). **Must be an IP, not a hostname.** |
| `SERVER_PORT` | Optional | `8000` | Thermostat device API port (inside container) |
| `CONTROL_PORT` | Optional | `8082` | Dashboard/control API port (inside container) |
| `REQUIRE_DEVICE_PAIRING` | Optional | `false` | If `true`, require 7-char pairing code before device access |
| `ENTRY_KEY_TTL_SECONDS` | Optional | `3600` | Entry key validity in seconds |
| `MQTT_HOST` | Optional | (empty) | MQTT broker IP — enables Home Assistant auto-discovery |
| `MQTT_PORT` | Optional | `1883` | MQTT broker port |
| `MQTT_USER` / `MQTT_PASSWORD` | Optional | (empty) | MQTT credentials |
| `MQTT_TOPIC_PREFIX` | Optional | `nolongerevil` | MQTT topic prefix |
| `MQTT_DISCOVERY_PREFIX` | Optional | `homeassistant` | HA MQTT discovery prefix |
| `DEBUG_LOGGING` | Optional | `false` | Set `true` for verbose logs |
| `DEBUG_LOGS_DIR` | Optional | `./data/debug-logs` | Debug log output directory |
| `STORE_DEVICE_LOGS` | Optional | (disabled) | Store raw device communication logs to disk |
| `SQLITE3_DB_PATH` | Optional | `/app/data/database.sqlite` | SQLite database path |
| `CERT_DIR` | Optional | (disabled) | Path to TLS certificates for HTTPS |
| `WEATHER_CACHE_TTL_MS` | Optional | `600000` | Weather cache duration in ms |
| `MAX_SUBSCRIPTIONS_PER_DEVICE` | Optional | `100` | Max long-poll subscriptions per device |
| `SUSPEND_TIME_MAX` | Optional | `600` | Device sleep before fallback wake (seconds) |
| `DEFER_DEVICE_WINDOW` | Optional | `15` | Delay before device PUT after local changes (seconds) |
| `DISABLE_DEFER_WINDOW` | Optional | `60` | Post-push defer disable window (seconds) |
Full reference: [github.com/codykociemba/NoLongerEvil-SelfHosted](https://github.com/codykociemba/NoLongerEvil-SelfHosted)
Your NLE server is now running. Continue to [Part 2](#part-2:-flash-and-configure-via-gui-installer) below to flash your thermostat.
***
### Option D — NAS Platforms
Most NAS platforms should be supported as long as they can run a Docker container. The steps below cover the most common platforms — if yours isn't listed, refer to Option B (Standalone Docker) as a general guide.
> **Image:** `ghcr.io/codykociemba/nolongerevil-selfhosted:latest`
1. Open the **Docker** tab in Unraid UI
2. Click **Add Container**
3. Set **Repository** to: `ghcr.io/codykociemba/nolongerevil-selfhosted:latest`
4. Add Port Mappings:
* `8000` → `8000` (API)
* `8082` → `8082` (Control)
5. Add Path: Container path `/data` → Host path `/mnt/user/appdata/nolongerevil`
6. Add Variable: `API_ORIGIN` = `http://[UNRAID-IP]:8000`
7. Click **Apply**
**Via Apps (TrueNAS SCALE):**
1. Go to **Apps** → **Discover Apps** → search for custom app
2. Use the Docker Compose method via Shell — clone `codykociemba/NoLongerEvil-SelfHosted` and run `docker compose up -d` after setting `API_ORIGIN`
**Via Shell:**
```bash theme={null}
docker run -d \
-p 8000:8000 \
-p 8082:8082 \
--name nolongerevil-server \
-e API_ORIGIN=http://[TRUENAS-IP]:8000 \
-v /mnt/pool/nolongerevil:/data \
ghcr.io/codykociemba/nolongerevil-selfhosted:latest
```
1. Open **Container Manager** (formerly Docker app)
2. Go to **Registry** → search `ghcr.io/codykociemba/nolongerevil-selfhosted`
3. Download the image (select `latest`)
4. Go to **Container** → **Create**
5. Configure:
* Ports: `8000:8000`, `8082:8082`
* Volume: `/docker/nolongerevil` → `/data`
* Environment: `API_ORIGIN=http://[SYNOLOGY-IP]:8000`
6. Click **Apply**
1. Go to your Portainer instance → **Containers** → **Add Container**
2. **Image:** `ghcr.io/codykociemba/nolongerevil-selfhosted:latest`
3. **Port mapping:** `8000:8000`, `8082:8082`
4. **Volumes:** bind mount or named volume → `/data`
5. **Env:** `API_ORIGIN=http://[HOST-IP]:8000`
6. **Deploy the container**
Your NLE server is now running. Continue to [Part 2](#part-2:-flash-and-configure-via-gui-installer) below to flash your thermostat.
***
### Option E — Python Direct
For users who don't have Docker, or developers working on the NLE server codebase.
Requires Python 3.11+.
```bash theme={null}
git clone https://github.com/codykociemba/NoLongerEvil-SelfHosted.git
cd NoLongerEvil-SelfHosted
python -m venv .venv
source .venv/bin/activate
pip install .
cp .env.example .env
# Edit .env — set API_ORIGIN to your LAN IP (e.g., API_ORIGIN=http://192.168.1.50:8000)
nolongerevil-server
# Or: python -m nolongerevil.main
```
This runs the same Python server that's packaged inside the Docker image. Use this if Docker isn't available, or if you're contributing to the server codebase and want to run it directly during development.
Your NLE server is now running. Continue to [Part 2](#part-2:-flash-and-configure-via-gui-installer) below to flash your thermostat.
***
## Part 2: Flash and Configure via GUI Installer
**Platform requirements — read before downloading:**
**Windows is not supported and has no workaround.**
The Nest thermostat only stays in DFU mode for a few seconds. Windows cannot
complete USB driver setup within that window. WSL2 does not help — the USB
device passthrough cannot be fast enough. Use macOS or Linux.
| Platform | Download |
| --------------------------------- | ----------------------------------------------------------------------------------------------------------------------------------------------------- |
| macOS (Intel x64) | [`nolongerevil-macos-x64.zip`](https://github.com/codykociemba/NoLongerEvil-Thermostat/releases/download/v1.0.1/nolongerevil-macos-x64.zip) |
| macOS (Apple Silicon M1/M2/M3/M4) | [`nolongerevil-macos-arm64.zip`](https://github.com/codykociemba/NoLongerEvil-Thermostat/releases/download/v1.0.1/nolongerevil-macos-arm64.zip) |
| Linux (x64) | [`nolongerevil-linux-appimage.zip`](https://github.com/codykociemba/NoLongerEvil-Thermostat/releases/download/v1.0.1/nolongerevil-linux-appimage.zip) |
| Windows | ❌ Not supported |
### Step 1: Enter DFU Mode and Flash
Follow the same DFU procedure as the hosted installation — see [Step 3 of the hosted installation guide](/hosted/installation#step-3-enter-dfu-mode) for the full Gen 1 / Gen 2 instructions.
Once flashing completes you will see this screen:
**`api_origin` must be set before starting.**
The default value (`http://homeassistant.local:9543`) uses mDNS, which Nest devices cannot reliably resolve. If you start the add-on before setting a real IP, the thermostat will fail to connect.
**Do not skip this step.**
4. Click Save, then go to the **Info** tab at the top and click Start
5. Enable **Start on boot** and **Watchdog** (auto-restart on crash)
6. (Optional) Enable **Auto update** and **Show in sidebar** for easy dashboard access
Your NLE server is now running. Continue to [Part 2](#part-2:-flash-and-configure-via-gui-installer) below to flash your thermostat and connect it to your server.
| Port | Purpose |
| ---------------------------------- | ------------------------------------------------------------------------ |
| `9543` (host) → `8000` (container) | Nest device communication — this is what you enter as the server address |
| `8082` | Control API + Web UI (Ingress/sidebar only by default) |
You do not need to configure these ports for a standard local setup — the add-on handles this automatically.
To expose the dashboard directly (e.g., `http://[HA-IP]:8082`): Settings → Add-ons → No Longer Evil → Configuration → Network → assign a host port to container port `8082`.
**Security risk:** Exposing port 8082 directly gives unauthenticated access to the NLE dashboard. If your Home Assistant instance is accessible from outside your network, do not expose this port unless you fully understand the risks and have additional access controls in place.
**When the GUI installer runs for an HA add-on user:**
* The installer scans the LAN for a running NLE server via the `/info` endpoint
* It will detect the add-on at port `9543`
* Select **Self-Hosted** in the wizard and confirm the detected address (`http://[HA-IP]:9543`)
***
### Option B — Standalone Docker
```bash theme={null}
docker run -d \
-p 8000:8000 \
-p 8082:8082 \
--name nolongerevil-server \
-e API_ORIGIN=http://YOUR_LAN_IP:8000 \
-v nolongerevil-data:/data \
ghcr.io/codykociemba/nolongerevil-selfhosted:latest
```
**`API_ORIGIN` must be your machine's LAN IP** (e.g., `http://192.168.1.50:8000`), not `localhost` or a hostname. The thermostat connects back to this address. The GUI installer reads it from the server's `/info` endpoint during setup.
Verify it's running:
```bash theme={null}
docker ps | grep nolongerevil
curl http://localhost:8082/health
```
Your NLE server is now running. Continue to [Part 2](#part-2:-flash-and-configure-via-gui-installer) below to flash your thermostat.
***
### Option C — Docker Compose
```bash theme={null}
git clone https://github.com/codykociemba/NoLongerEvil-SelfHosted.git
cd NoLongerEvil-SelfHosted
```
Edit `docker-compose.yml` — set `API_ORIGIN` to your LAN IP, then:
```bash theme={null}
docker compose up -d
```
**Full environment variable reference:**
| Variable | Required | Default | Description |
| ------------------------------ | -------- | --------------------------- | ----------------------------------------------------------------------------------------------------- |
| `API_ORIGIN` | ✅ Yes | `http://localhost` | LAN IP:port devices connect to (e.g., `http://192.168.1.50:8000`). **Must be an IP, not a hostname.** |
| `SERVER_PORT` | Optional | `8000` | Thermostat device API port (inside container) |
| `CONTROL_PORT` | Optional | `8082` | Dashboard/control API port (inside container) |
| `REQUIRE_DEVICE_PAIRING` | Optional | `false` | If `true`, require 7-char pairing code before device access |
| `ENTRY_KEY_TTL_SECONDS` | Optional | `3600` | Entry key validity in seconds |
| `MQTT_HOST` | Optional | (empty) | MQTT broker IP — enables Home Assistant auto-discovery |
| `MQTT_PORT` | Optional | `1883` | MQTT broker port |
| `MQTT_USER` / `MQTT_PASSWORD` | Optional | (empty) | MQTT credentials |
| `MQTT_TOPIC_PREFIX` | Optional | `nolongerevil` | MQTT topic prefix |
| `MQTT_DISCOVERY_PREFIX` | Optional | `homeassistant` | HA MQTT discovery prefix |
| `DEBUG_LOGGING` | Optional | `false` | Set `true` for verbose logs |
| `DEBUG_LOGS_DIR` | Optional | `./data/debug-logs` | Debug log output directory |
| `STORE_DEVICE_LOGS` | Optional | (disabled) | Store raw device communication logs to disk |
| `SQLITE3_DB_PATH` | Optional | `/app/data/database.sqlite` | SQLite database path |
| `CERT_DIR` | Optional | (disabled) | Path to TLS certificates for HTTPS |
| `WEATHER_CACHE_TTL_MS` | Optional | `600000` | Weather cache duration in ms |
| `MAX_SUBSCRIPTIONS_PER_DEVICE` | Optional | `100` | Max long-poll subscriptions per device |
| `SUSPEND_TIME_MAX` | Optional | `600` | Device sleep before fallback wake (seconds) |
| `DEFER_DEVICE_WINDOW` | Optional | `15` | Delay before device PUT after local changes (seconds) |
| `DISABLE_DEFER_WINDOW` | Optional | `60` | Post-push defer disable window (seconds) |
Full reference: [github.com/codykociemba/NoLongerEvil-SelfHosted](https://github.com/codykociemba/NoLongerEvil-SelfHosted)
Your NLE server is now running. Continue to [Part 2](#part-2:-flash-and-configure-via-gui-installer) below to flash your thermostat.
***
### Option D — NAS Platforms
Most NAS platforms should be supported as long as they can run a Docker container. The steps below cover the most common platforms — if yours isn't listed, refer to Option B (Standalone Docker) as a general guide.
> **Image:** `ghcr.io/codykociemba/nolongerevil-selfhosted:latest`
1. Open the **Docker** tab in Unraid UI
2. Click **Add Container**
3. Set **Repository** to: `ghcr.io/codykociemba/nolongerevil-selfhosted:latest`
4. Add Port Mappings:
* `8000` → `8000` (API)
* `8082` → `8082` (Control)
5. Add Path: Container path `/data` → Host path `/mnt/user/appdata/nolongerevil`
6. Add Variable: `API_ORIGIN` = `http://[UNRAID-IP]:8000`
7. Click **Apply**
**Via Apps (TrueNAS SCALE):**
1. Go to **Apps** → **Discover Apps** → search for custom app
2. Use the Docker Compose method via Shell — clone `codykociemba/NoLongerEvil-SelfHosted` and run `docker compose up -d` after setting `API_ORIGIN`
**Via Shell:**
```bash theme={null}
docker run -d \
-p 8000:8000 \
-p 8082:8082 \
--name nolongerevil-server \
-e API_ORIGIN=http://[TRUENAS-IP]:8000 \
-v /mnt/pool/nolongerevil:/data \
ghcr.io/codykociemba/nolongerevil-selfhosted:latest
```
1. Open **Container Manager** (formerly Docker app)
2. Go to **Registry** → search `ghcr.io/codykociemba/nolongerevil-selfhosted`
3. Download the image (select `latest`)
4. Go to **Container** → **Create**
5. Configure:
* Ports: `8000:8000`, `8082:8082`
* Volume: `/docker/nolongerevil` → `/data`
* Environment: `API_ORIGIN=http://[SYNOLOGY-IP]:8000`
6. Click **Apply**
1. Go to your Portainer instance → **Containers** → **Add Container**
2. **Image:** `ghcr.io/codykociemba/nolongerevil-selfhosted:latest`
3. **Port mapping:** `8000:8000`, `8082:8082`
4. **Volumes:** bind mount or named volume → `/data`
5. **Env:** `API_ORIGIN=http://[HOST-IP]:8000`
6. **Deploy the container**
Your NLE server is now running. Continue to [Part 2](#part-2:-flash-and-configure-via-gui-installer) below to flash your thermostat.
***
### Option E — Python Direct
For users who don't have Docker, or developers working on the NLE server codebase.
Requires Python 3.11+.
```bash theme={null}
git clone https://github.com/codykociemba/NoLongerEvil-SelfHosted.git
cd NoLongerEvil-SelfHosted
python -m venv .venv
source .venv/bin/activate
pip install .
cp .env.example .env
# Edit .env — set API_ORIGIN to your LAN IP (e.g., API_ORIGIN=http://192.168.1.50:8000)
nolongerevil-server
# Or: python -m nolongerevil.main
```
This runs the same Python server that's packaged inside the Docker image. Use this if Docker isn't available, or if you're contributing to the server codebase and want to run it directly during development.
Your NLE server is now running. Continue to [Part 2](#part-2:-flash-and-configure-via-gui-installer) below to flash your thermostat.
***
## Part 2: Flash and Configure via GUI Installer
**Platform requirements — read before downloading:**
**Windows is not supported and has no workaround.**
The Nest thermostat only stays in DFU mode for a few seconds. Windows cannot
complete USB driver setup within that window. WSL2 does not help — the USB
device passthrough cannot be fast enough. Use macOS or Linux.
| Platform | Download |
| --------------------------------- | ----------------------------------------------------------------------------------------------------------------------------------------------------- |
| macOS (Intel x64) | [`nolongerevil-macos-x64.zip`](https://github.com/codykociemba/NoLongerEvil-Thermostat/releases/download/v1.0.1/nolongerevil-macos-x64.zip) |
| macOS (Apple Silicon M1/M2/M3/M4) | [`nolongerevil-macos-arm64.zip`](https://github.com/codykociemba/NoLongerEvil-Thermostat/releases/download/v1.0.1/nolongerevil-macos-arm64.zip) |
| Linux (x64) | [`nolongerevil-linux-appimage.zip`](https://github.com/codykociemba/NoLongerEvil-Thermostat/releases/download/v1.0.1/nolongerevil-linux-appimage.zip) |
| Windows | ❌ Not supported |
### Step 1: Enter DFU Mode and Flash
Follow the same DFU procedure as the hosted installation — see [Step 3 of the hosted installation guide](/hosted/installation#step-3-enter-dfu-mode) for the full Gen 1 / Gen 2 instructions.
Once flashing completes you will see this screen:
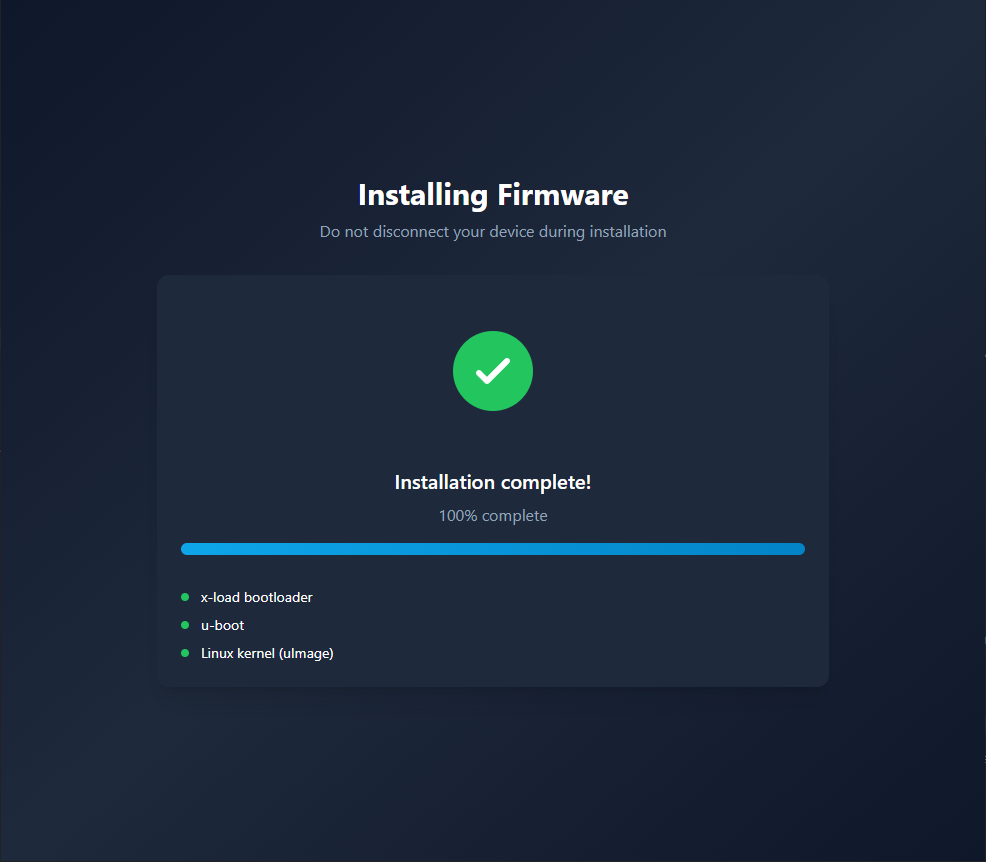 **Firmware flashed successfully** — The bootloader and kernel have been written to the device. Keep the USB cable connected — the device will now begin booting into the new firmware.
**If flashing failed mid-way:** Unplug and repeat the back plate sequence, then re-run the installer. A partial flash will not permanently damage the device — the DFU bootloader is always recoverable.
***
### Step 2: Wait for Boot
Keep the device plugged in via USB and wait for it to complete its boot sequence — this may take 3–4 minutes. When fully booted, you should see the default Nest temperature screen.
**Do not disconnect or power off the device during this time.**
***
### Step 3: Complete the Wizard
**Once the device has booted, the installer wizard takes over automatically.**
Make sure your NLE server is running before proceeding — the wizard will need to reach it to configure the thermostat.
**Firmware flashed successfully** — The bootloader and kernel have been written to the device. Keep the USB cable connected — the device will now begin booting into the new firmware.
**If flashing failed mid-way:** Unplug and repeat the back plate sequence, then re-run the installer. A partial flash will not permanently damage the device — the DFU bootloader is always recoverable.
***
### Step 2: Wait for Boot
Keep the device plugged in via USB and wait for it to complete its boot sequence — this may take 3–4 minutes. When fully booted, you should see the default Nest temperature screen.
**Do not disconnect or power off the device during this time.**
***
### Step 3: Complete the Wizard
**Once the device has booted, the installer wizard takes over automatically.**
Make sure your NLE server is running before proceeding — the wizard will need to reach it to configure the thermostat.
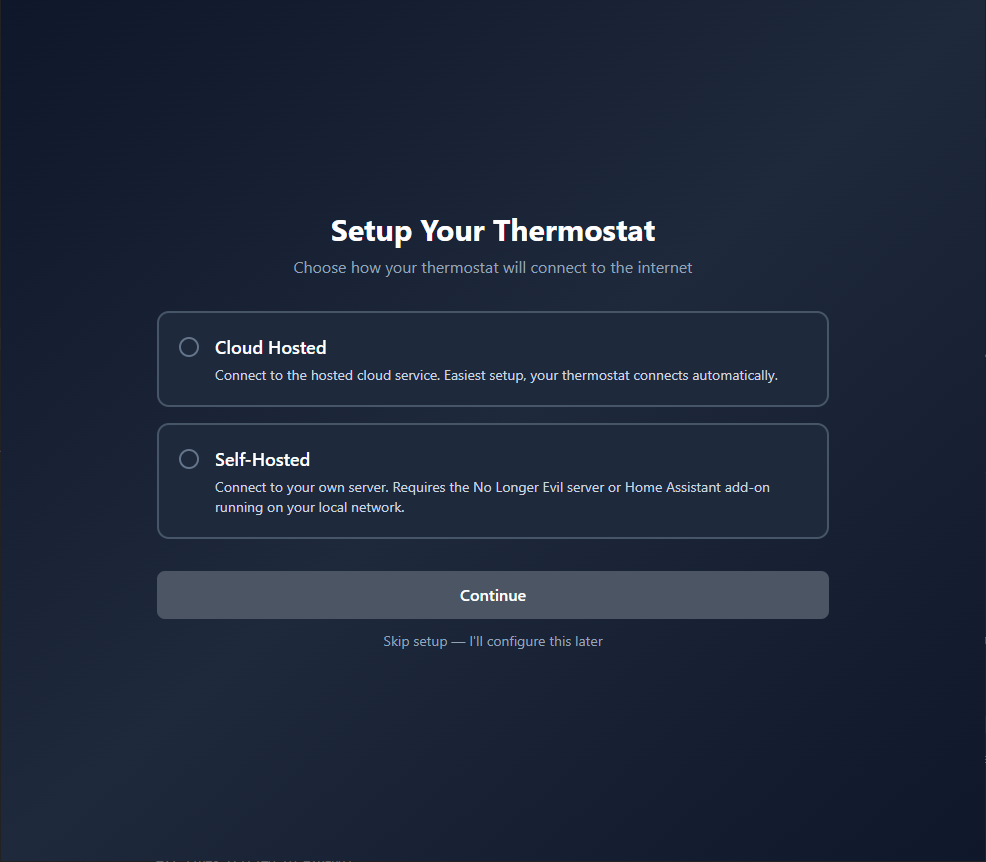 **Choose hosting mode** — Select **Self-Hosted**. If you haven't started your NLE server yet, go back and complete Part 1 first before continuing.
The installer scans your LAN for a running NLE server. If detected, confirm the address. If not found, enter it manually:
| Deployment | Server address to enter |
| ----------------- | ----------------------------------------------------------------- |
| Standalone Docker | `http://[YOUR-SERVER-IP]:8000` |
| HA Add-on | `http://[YOUR-HA-IP]:9543` |
| Python direct | `http://[YOUR-SERVER-IP]:8000` (or whichever port you configured) |
**Choose hosting mode** — Select **Self-Hosted**. If you haven't started your NLE server yet, go back and complete Part 1 first before continuing.
The installer scans your LAN for a running NLE server. If detected, confirm the address. If not found, enter it manually:
| Deployment | Server address to enter |
| ----------------- | ----------------------------------------------------------------- |
| Standalone Docker | `http://[YOUR-SERVER-IP]:8000` |
| HA Add-on | `http://[YOUR-HA-IP]:9543` |
| Python direct | `http://[YOUR-SERVER-IP]:8000` (or whichever port you configured) |
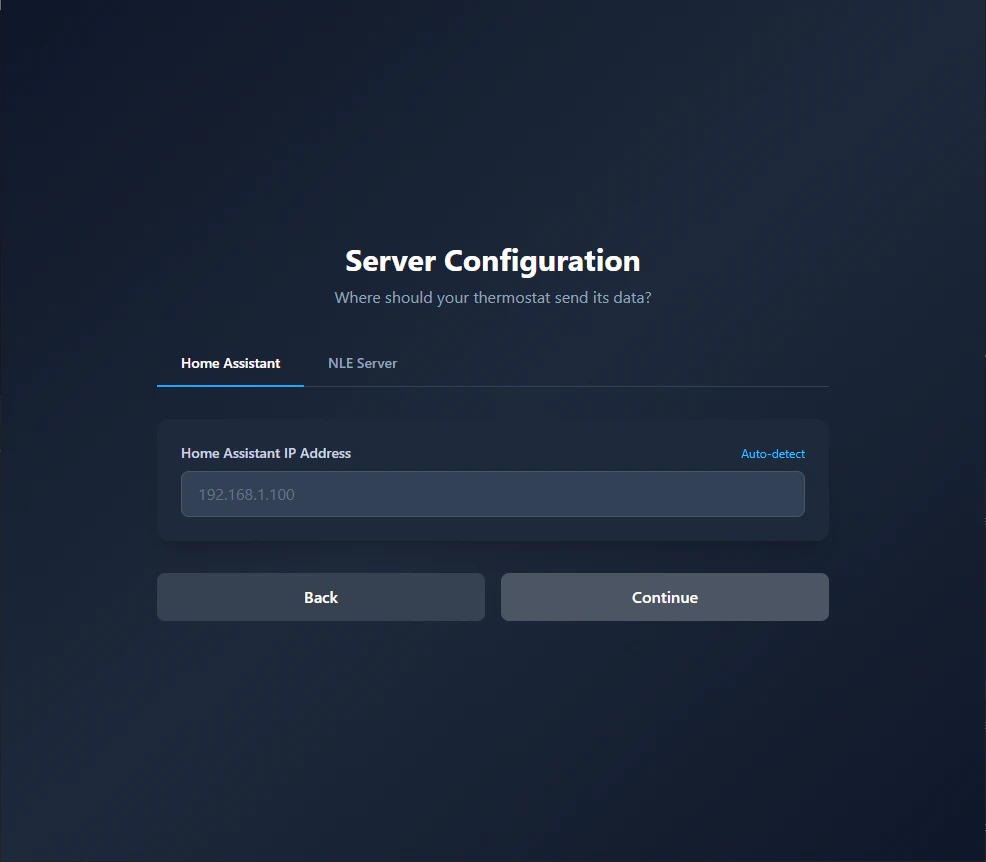 **Server configuration** — Enter your server address and click **Continue**. If the server was auto-detected on your LAN, it will appear here automatically — just confirm it's correct.
**If the server isn't detected:** Make sure the server is running (`docker ps` or check your HA add-on), that your computer is on the same network, and that `API_ORIGIN` is set to a LAN IP (not `localhost` or a hostname).
**Server configuration** — Enter your server address and click **Continue**. If the server was auto-detected on your LAN, it will appear here automatically — just confirm it's correct.
**If the server isn't detected:** Make sure the server is running (`docker ps` or check your HA add-on), that your computer is on the same network, and that `API_ORIGIN` is set to a LAN IP (not `localhost` or a hostname).
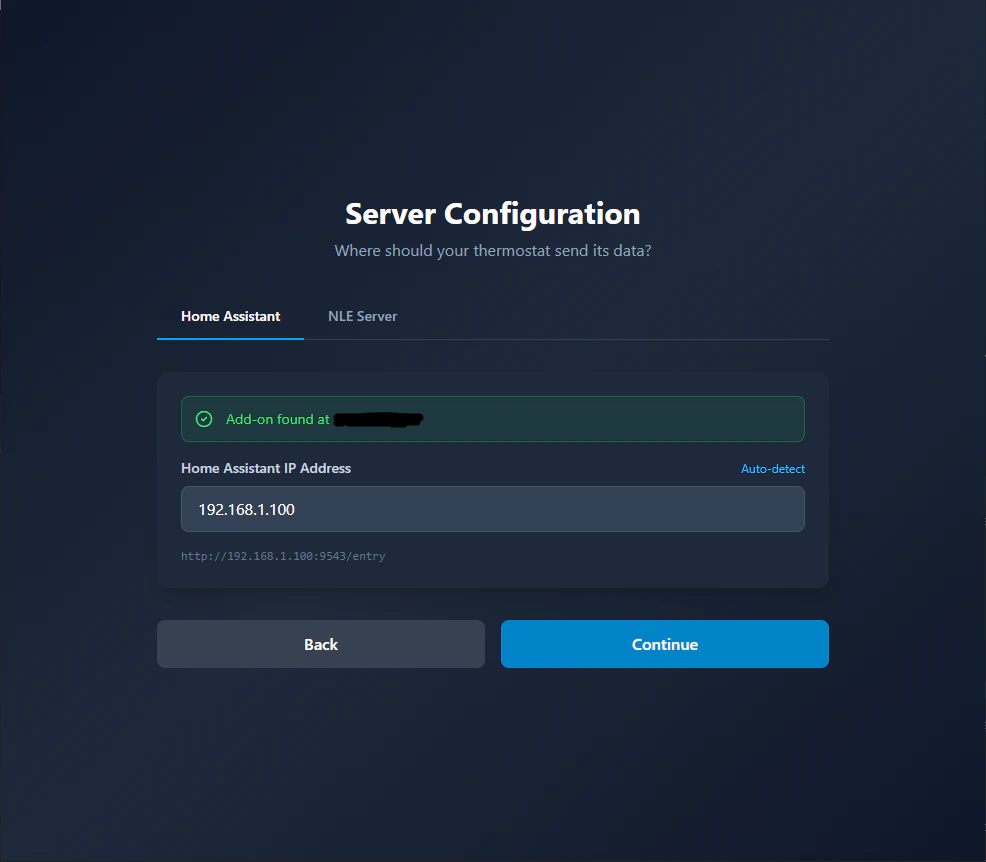 **Home Assistant auto-detected** — If the installer finds a running NLE add-on on your network, it will show it here. Confirm the address matches your HA machine's IP on port `9543`.
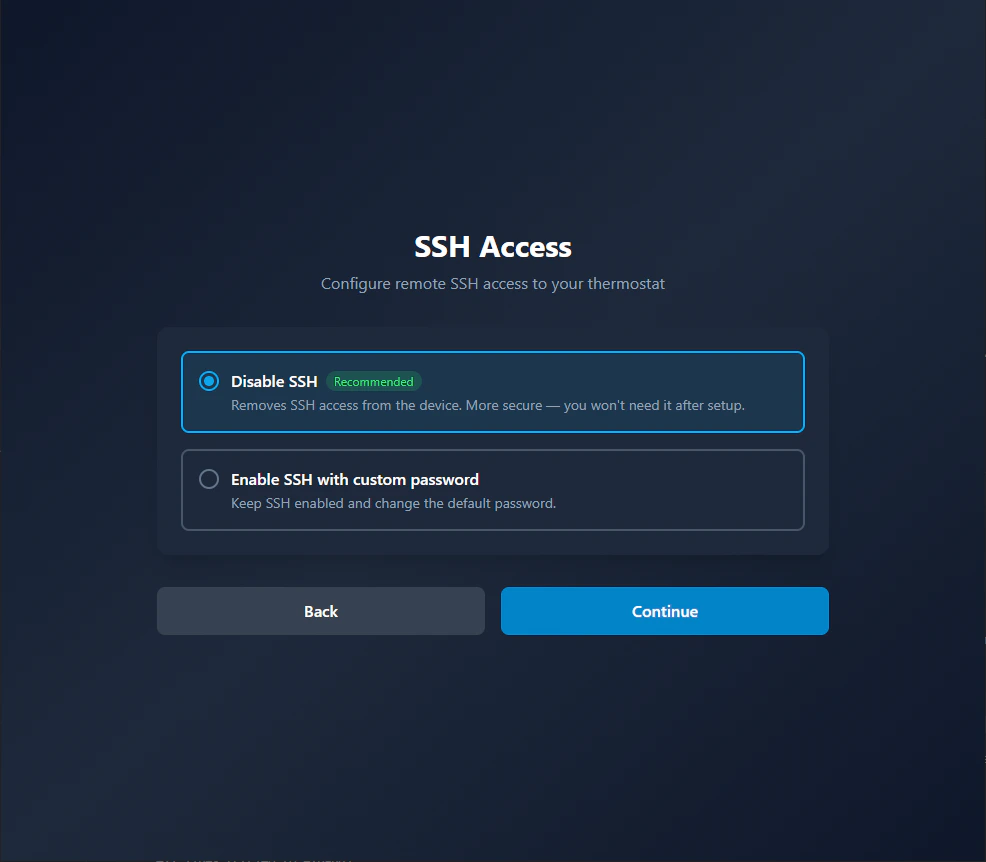 **SSH connection** — The wizard connects to the thermostat over SSH to configure it. The device must still be connected via USB and should have finished booting.
**If SSH fails:** Make sure the USB cable is still plugged in and the device shows the Nest temperature screen. Unplug and replug the USB cable, wait 30 seconds, and click Retry.
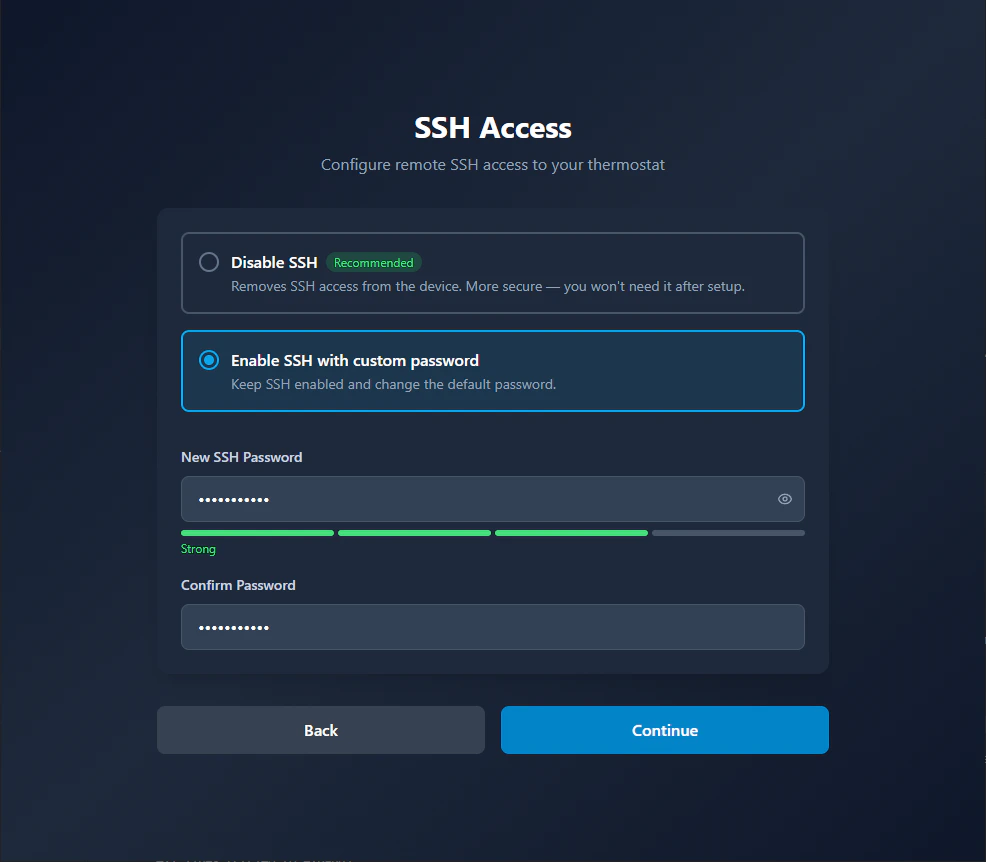
If you choose to keep SSH enabled, this screen lets you change the default SSH password from `nolongerevil` to a password of your choice. You can SSH into the device at any time with `ssh root@[THERMOSTAT-IP]`.
**SSH connection** — The wizard connects to the thermostat over SSH to configure it. The device must still be connected via USB and should have finished booting.
**If SSH fails:** Make sure the USB cable is still plugged in and the device shows the Nest temperature screen. Unplug and replug the USB cable, wait 30 seconds, and click Retry.
If you choose to keep SSH enabled, this screen lets you change the default SSH password from `nolongerevil` to a password of your choice. You can SSH into the device at any time with `ssh root@[THERMOSTAT-IP]`.
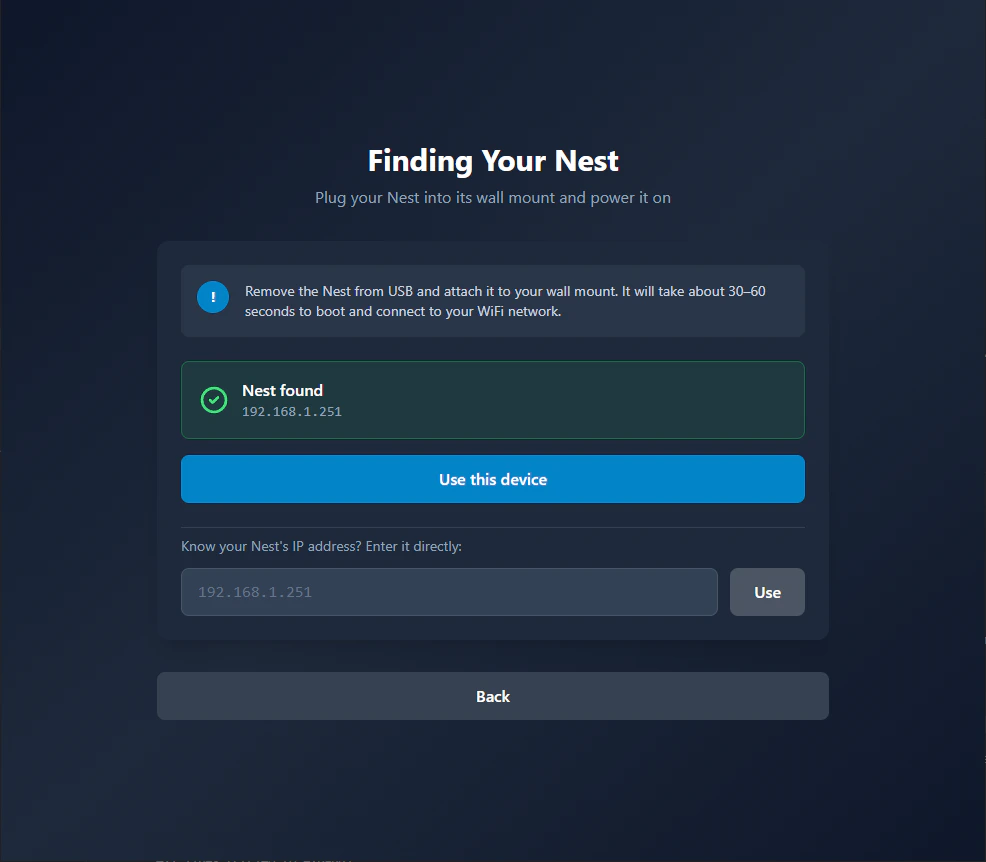 **Finding your Nest on the network** — The wizard scans your local network to locate the thermostat after it connects to WiFi. The device needs to be on the same network as your server.
**If the Nest isn't found:** Check the WiFi credentials on the Nest device itself and confirm it shows as connected. Alternatively, if you know the thermostat's IP address, you can enter it manually and click **Use**.
**Finding your Nest on the network** — The wizard scans your local network to locate the thermostat after it connects to WiFi. The device needs to be on the same network as your server.
**If the Nest isn't found:** Check the WiFi credentials on the Nest device itself and confirm it shows as connected. Alternatively, if you know the thermostat's IP address, you can enter it manually and click **Use**.
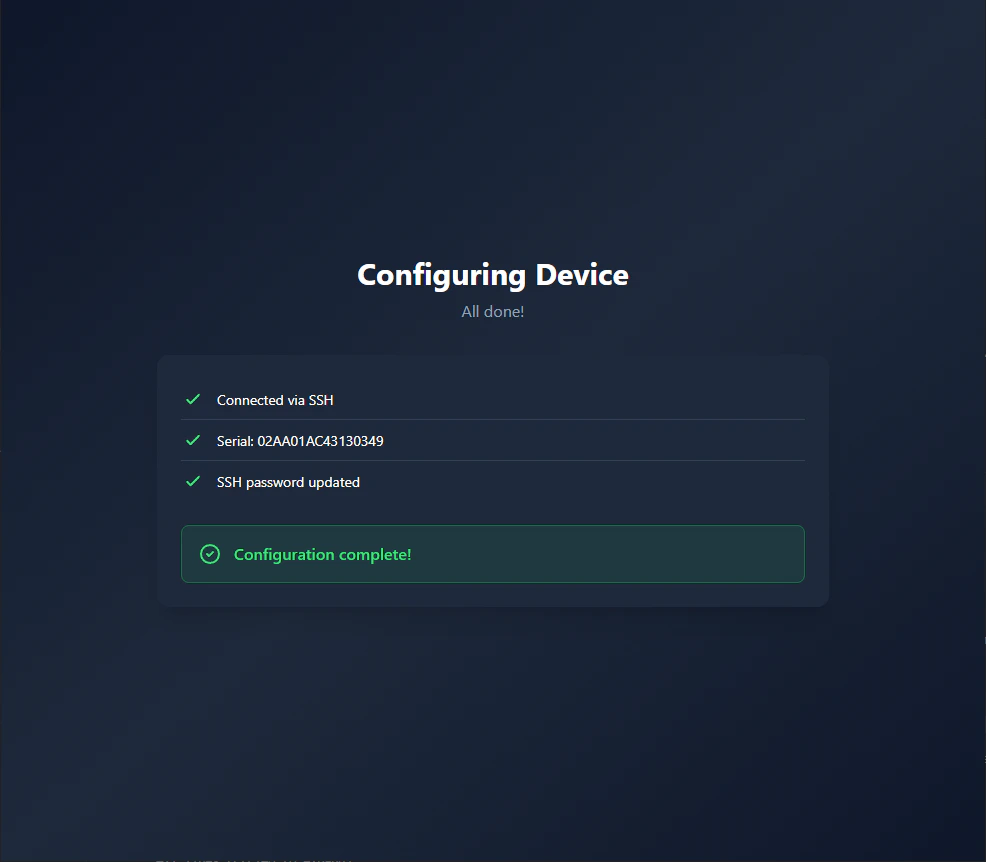 **Configuring device** — The wizard is writing your self-hosted server URL to the thermostat. Do not unplug or power off the device during this step.
**If provisioning fails:** Verify your server is still running and reachable, then retry. If it fails repeatedly, see the [Troubleshooting guide](/self-hosted/troubleshooting).
**Configuring device** — The wizard is writing your self-hosted server URL to the thermostat. Do not unplug or power off the device during this step.
**If provisioning fails:** Verify your server is still running and reachable, then retry. If it fails repeatedly, see the [Troubleshooting guide](/self-hosted/troubleshooting).
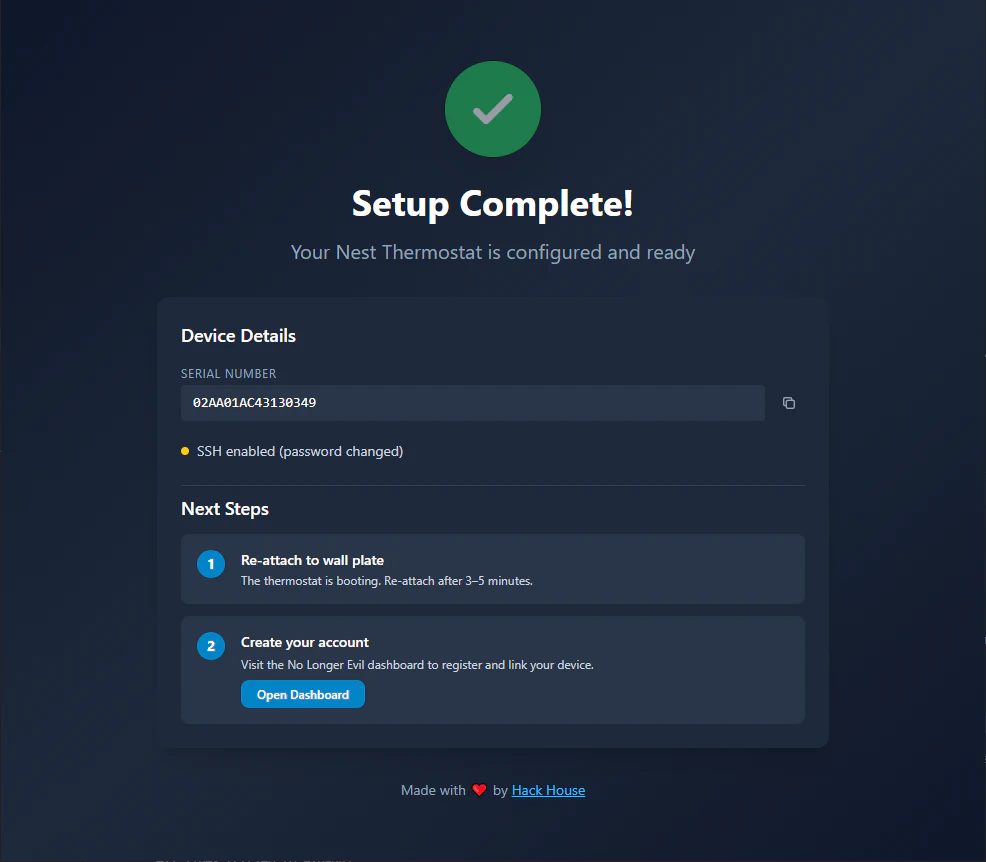 **Setup complete** — Verify the Server URL shown matches your self-hosted server address. If it shows the No Longer Evil cloud URL instead, the server was not detected correctly — see the [Troubleshooting guide](/self-hosted/troubleshooting).
**After the wizard completes — reboot the thermostat:**
The thermostat only sends its complete state (temperature, mode, schedule) to the server during a **fresh boot**. After the wizard finishes, reboot the device from the installer or by holding the display for 10 seconds. Without a reboot, the dashboard may show the device as connected but with no data.
***
## Managing Your Server
### Start/Stop Containers
**View running containers:**
```bash theme={null}
docker ps
```
**Stop the NLE server:**
```bash theme={null}
docker stop nolongerevil-server
```
**Restart the NLE server:**
```bash theme={null}
docker restart nolongerevil-server
```
### View Logs
**API Server logs:**
```bash theme={null}
docker logs nolongerevil-server
```
**Follow logs in real-time:**
```bash theme={null}
docker logs -f nolongerevil-server
```
**Last 50 lines:**
```bash theme={null}
docker logs nolongerevil-server --tail 50
```
### Update to Latest Version
```bash theme={null}
docker pull ghcr.io/codykociemba/nolongerevil-selfhosted:latest
docker stop nolongerevil-server
docker rm nolongerevil-server
# Re-run your original docker run command (data volume is preserved)
```
Or with Docker Compose:
```bash theme={null}
docker compose pull
docker compose up -d
```
### Home Assistant — Web UI
The NLE server includes a built-in web dashboard you can access directly from Home Assistant.
Open the **NoLongerEvil HomeAssistant** add-on in Settings → Add-ons, or click **NLE Thermostats** in the sidebar if you enabled the **Show in sidebar** option.
Then click Open Web UI.
The Web UI lets you:
* View all connected thermostats
* Add new thermostats or scan for devices on your network
* Modify thermostat controls directly — useful if you prefer not to use the Home Assistant interface
***
## Configure Networking (For Remote Access — Optional)
**This section is only needed if you want to access your thermostat from outside your local network (over the internet).** For standard home LAN use, skip this section — the thermostat connects to your server directly on the local network.
Configure your router to forward these ports to your server:
* **Port 8000** - Thermostat Communication API
* **Port 8082** - Control API / Dashboard
Set up a domain name or Dynamic DNS (DDNS) service to point to your public IP:
* Use a service like DuckDNS, No-IP, or your own domain
* Configure it to update automatically if your IP changes
For secure HTTPS access, set up SSL certificates:
* Use Let's Encrypt with certbot
* Or use a reverse proxy like nginx with automatic certificate management
```bash theme={null}
sudo apt-get install certbot
sudo certbot certonly --standalone -d your-domain.com
```
Configure the `CERT_DIR` environment variable to point to your certificate directory.
***
## Next Steps
Solutions to common self-hosting issues
Learn about the API endpoints
**Setup complete** — Verify the Server URL shown matches your self-hosted server address. If it shows the No Longer Evil cloud URL instead, the server was not detected correctly — see the [Troubleshooting guide](/self-hosted/troubleshooting).
**After the wizard completes — reboot the thermostat:**
The thermostat only sends its complete state (temperature, mode, schedule) to the server during a **fresh boot**. After the wizard finishes, reboot the device from the installer or by holding the display for 10 seconds. Without a reboot, the dashboard may show the device as connected but with no data.
***
## Managing Your Server
### Start/Stop Containers
**View running containers:**
```bash theme={null}
docker ps
```
**Stop the NLE server:**
```bash theme={null}
docker stop nolongerevil-server
```
**Restart the NLE server:**
```bash theme={null}
docker restart nolongerevil-server
```
### View Logs
**API Server logs:**
```bash theme={null}
docker logs nolongerevil-server
```
**Follow logs in real-time:**
```bash theme={null}
docker logs -f nolongerevil-server
```
**Last 50 lines:**
```bash theme={null}
docker logs nolongerevil-server --tail 50
```
### Update to Latest Version
```bash theme={null}
docker pull ghcr.io/codykociemba/nolongerevil-selfhosted:latest
docker stop nolongerevil-server
docker rm nolongerevil-server
# Re-run your original docker run command (data volume is preserved)
```
Or with Docker Compose:
```bash theme={null}
docker compose pull
docker compose up -d
```
### Home Assistant — Web UI
The NLE server includes a built-in web dashboard you can access directly from Home Assistant.
Open the **NoLongerEvil HomeAssistant** add-on in Settings → Add-ons, or click **NLE Thermostats** in the sidebar if you enabled the **Show in sidebar** option.
Then click Open Web UI.
The Web UI lets you:
* View all connected thermostats
* Add new thermostats or scan for devices on your network
* Modify thermostat controls directly — useful if you prefer not to use the Home Assistant interface
***
## Configure Networking (For Remote Access — Optional)
**This section is only needed if you want to access your thermostat from outside your local network (over the internet).** For standard home LAN use, skip this section — the thermostat connects to your server directly on the local network.
Configure your router to forward these ports to your server:
* **Port 8000** - Thermostat Communication API
* **Port 8082** - Control API / Dashboard
Set up a domain name or Dynamic DNS (DDNS) service to point to your public IP:
* Use a service like DuckDNS, No-IP, or your own domain
* Configure it to update automatically if your IP changes
For secure HTTPS access, set up SSL certificates:
* Use Let's Encrypt with certbot
* Or use a reverse proxy like nginx with automatic certificate management
```bash theme={null}
sudo apt-get install certbot
sudo certbot certonly --standalone -d your-domain.com
```
Configure the `CERT_DIR` environment variable to point to your certificate directory.
***
## Next Steps
Solutions to common self-hosting issues
Learn about the API endpoints