> ## Documentation Index
> Fetch the complete documentation index at: https://docs.nolongerevil.com/llms.txt
> Use this file to discover all available pages before exploring further.
# Installation Guide
> Step-by-step instructions to flash firmware and set up your Nest thermostat
**Before you begin:**
* Ensure you have a **Nest Generation 1 or Generation 2** thermostat ([check compatibility](/compatibility))
* **Gen 1 requires device teardown** - only proceed if comfortable with electronics disassembly
* **Charge your Nest first** — If the device hasn't been used in a while, plug it into USB and let it charge for at least 30 minutes before flashing. A low battery can cause the flash to fail or the device to shut off mid-process.
## What You'll Need
Nest Generation 1 or 2 thermostat with at least 50% battery charge
[Check compatibility →](/compatibility)
Linux or macOS only
❌ Windows is NOT supported — see below
Mini USB (Gen 1) or Micro USB (Gen 2)
Must be data-capable, not charge-only
For Gen 1 Only
Metal tweezers/conductive tool
***
## Step 1: Download Firmware Installer
**Windows is not supported.**
The Nest thermostat only remains in DFU (flash) mode for a few seconds after USB connection.
Windows requires too long to install the USB bootloader driver, making it impossible to flash
in time. This is a hardware timing constraint — WSL2, virtual machines, and other workarounds
do not solve it.
**You must use macOS or Linux to flash your thermostat.**
Download the firmware installer for your operating system:
**macOS (Intel x64)**
Intel Macs
Click to download →
**macOS (Apple Silicon)**
M1/M2/M3/M4 Macs
Click to download →
**Linux (x64)**
Ubuntu, Debian, Fedora, etc.
Click to download →
***
## Step 2: Prepare the Installer
1. **Install dependencies**:
```bash theme={null}
sudo apt-get update
sudo apt-get install -y unzip curl build-essential libusb-1.0-0-dev libudev-dev gcc pkg-config
curl -fsSL https://deb.nodesource.com/setup_20.x | sudo -E bash -
sudo apt-get install -y nodejs
```
2. **Extract the downloaded .zip file**:
```bash theme={null}
unzip nolongerevil-linux-appimage.zip
```
3. **Make the AppImage executable**:
```bash theme={null}
chmod +x nolongerevil-*.AppImage
```
4. **Add USB device permissions** (Optional, but recommended):
```bash theme={null}
echo 'SUBSYSTEM=="usb", ATTR{idVendor}=="0451", MODE="0666"' | sudo tee /etc/udev/rules.d/99-omap.rules
sudo udevadm control --reload-rules
```
If you skip this and hit a "permission denied" error later, come back and run these, then retry.
5. **Run the AppImage**:
```bash theme={null}
./nolongerevil-*.AppImage
```
**The installer GUI will open and walk you through the rest of the process.**
You can follow the on-screen wizard instead of reading the steps below.
1. **Extract the downloaded .zip file**:
* Double-click the downloaded `.zip` in Finder (`nolongerevil-macos-x64.zip` or `nolongerevil-macos-arm64.zip`)
2. **Open the app**:
* Double-click NoLongerEvil Installer.app
* If macOS blocks it, right-click → Open, then click Open again
**First time opening**: macOS may show a security warning. Go to System Preferences → Security & Privacy and click "Open Anyway" if needed.
**The installer GUI will open and walk you through the rest of the process.**
You can follow the on-screen wizard instead of reading the steps below.
If the pre-built installer doesn't work for you, you can run it manually from source:
```bash theme={null}
# Install dependencies
sudo apt-get update
sudo apt-get install -y curl build-essential libusb-1.0-0-dev libudev-dev gcc pkg-config
# Install Node.js 20 (required)
curl -fsSL https://deb.nodesource.com/setup_20.x | sudo -E bash -
sudo apt-get install -y nodejs
# Clone the repository
git clone https://github.com/codykociemba/NoLongerEvil-Thermostat.git NoLongerEvil-Thermostat
# Run the installer
cd NoLongerEvil-Thermostat/firmware/installer
npm install
npm run electron:dev
```
```bash theme={null}
# Install Homebrew if not already installed
/bin/bash -c "$(curl -fsSL https://raw.githubusercontent.com/Homebrew/install/HEAD/install.sh)"
# Install Node.js 20 (required)
brew install node@20
brew link --overwrite node@20
# Clone the repository
git clone https://github.com/codykociemba/NoLongerEvil-Thermostat.git NoLongerEvil-Thermostat
# Run the installer
cd NoLongerEvil-Thermostat/firmware/installer
npm install
npm run electron:dev
```
This will run the installer directly from source using Electron. The installer GUI will open just like the pre-built version.
***
## Step 3: Enter DFU Mode
When you launch the installer, it will first run a system check and then ask you to select your device generation:
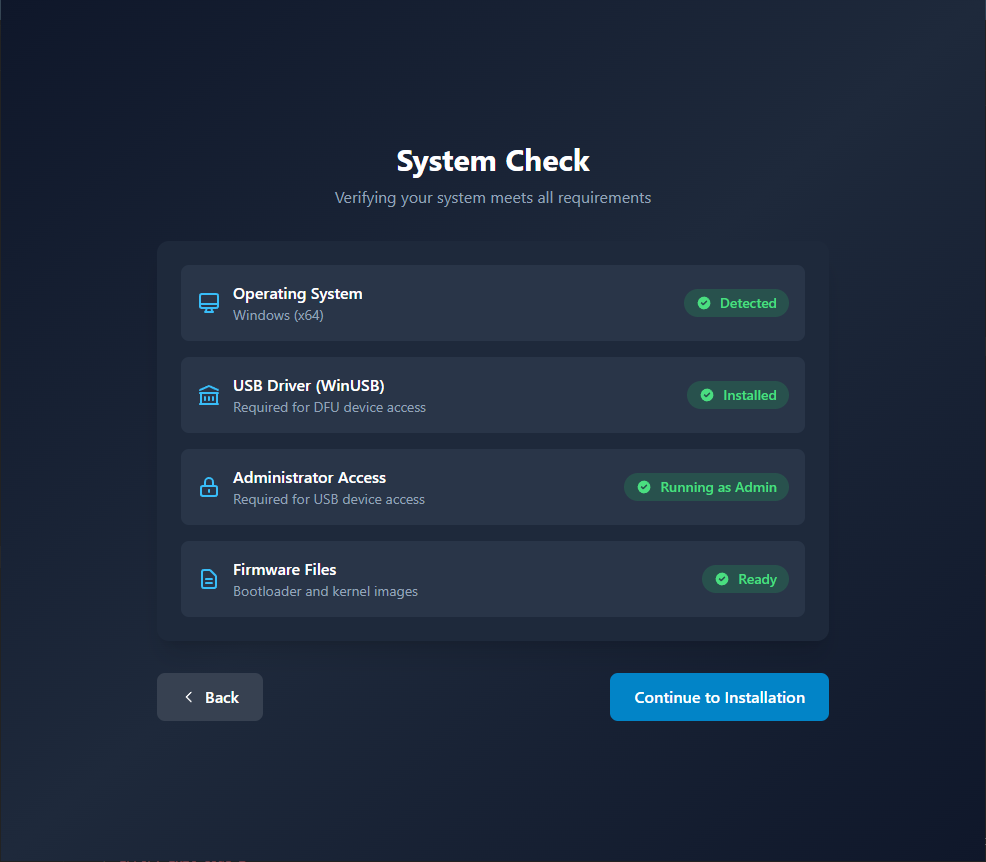 **System Check** — The installer verifies that required dependencies are present before proceeding.
**If it fails:**
* **libusb not found** — You skipped the dependency install step. Run `sudo apt-get install -y libusb-1.0-0-dev libudev-dev` (Linux) or `brew install libusb` (macOS), then relaunch the installer.
* **Permission error / USB access denied** — On Linux, add the udev rule from Step 2 and relaunch. On macOS, grant USB access in System Preferences → Security & Privacy.
* **On macOS: "app is damaged" or won't open** — Right-click → Open, then click Open in the dialog. Or go to System Preferences → Security & Privacy → General → click "Open Anyway".
**System Check** — The installer verifies that required dependencies are present before proceeding.
**If it fails:**
* **libusb not found** — You skipped the dependency install step. Run `sudo apt-get install -y libusb-1.0-0-dev libudev-dev` (Linux) or `brew install libusb` (macOS), then relaunch the installer.
* **Permission error / USB access denied** — On Linux, add the udev rule from Step 2 and relaunch. On macOS, grant USB access in System Preferences → Security & Privacy.
* **On macOS: "app is damaged" or won't open** — Right-click → Open, then click Open in the dialog. Or go to System Preferences → Security & Privacy → General → click "Open Anyway".
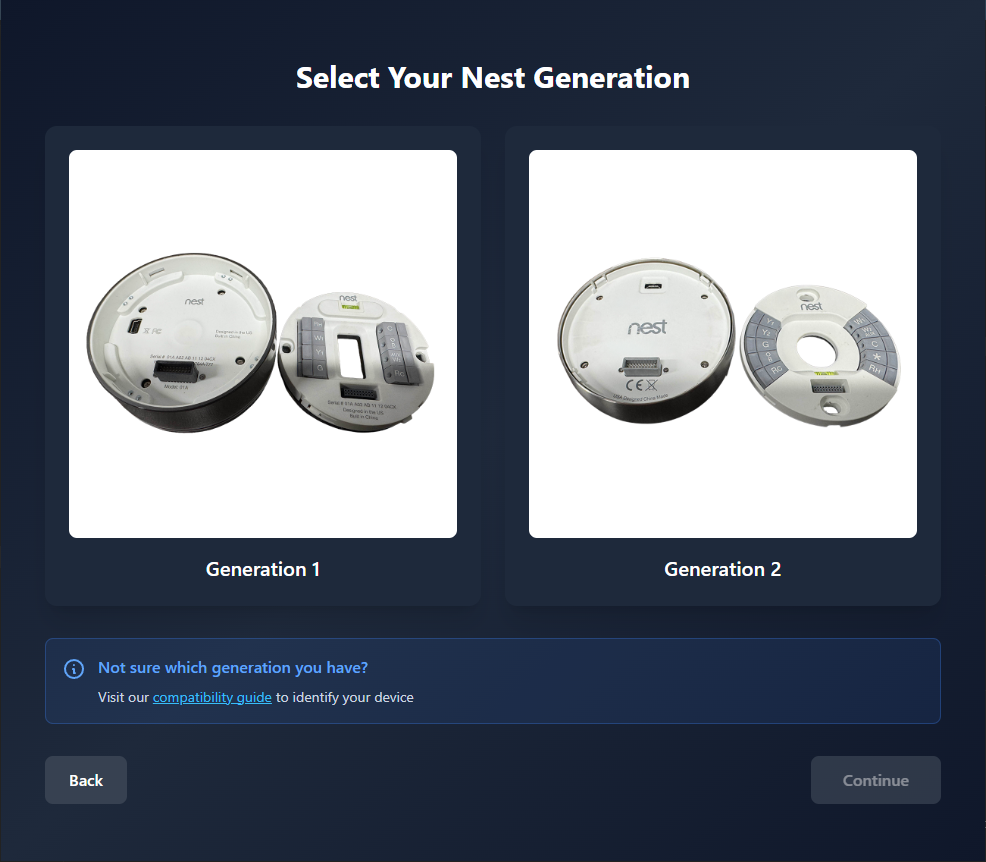 **Select Generation** — Choose whether your thermostat is a Generation 1 or Generation 2 device. If you're unsure, check the [compatibility page](/compatibility). Selecting the wrong generation will flash incorrect firmware — if this happens, simply re-run the installer and select the correct option.
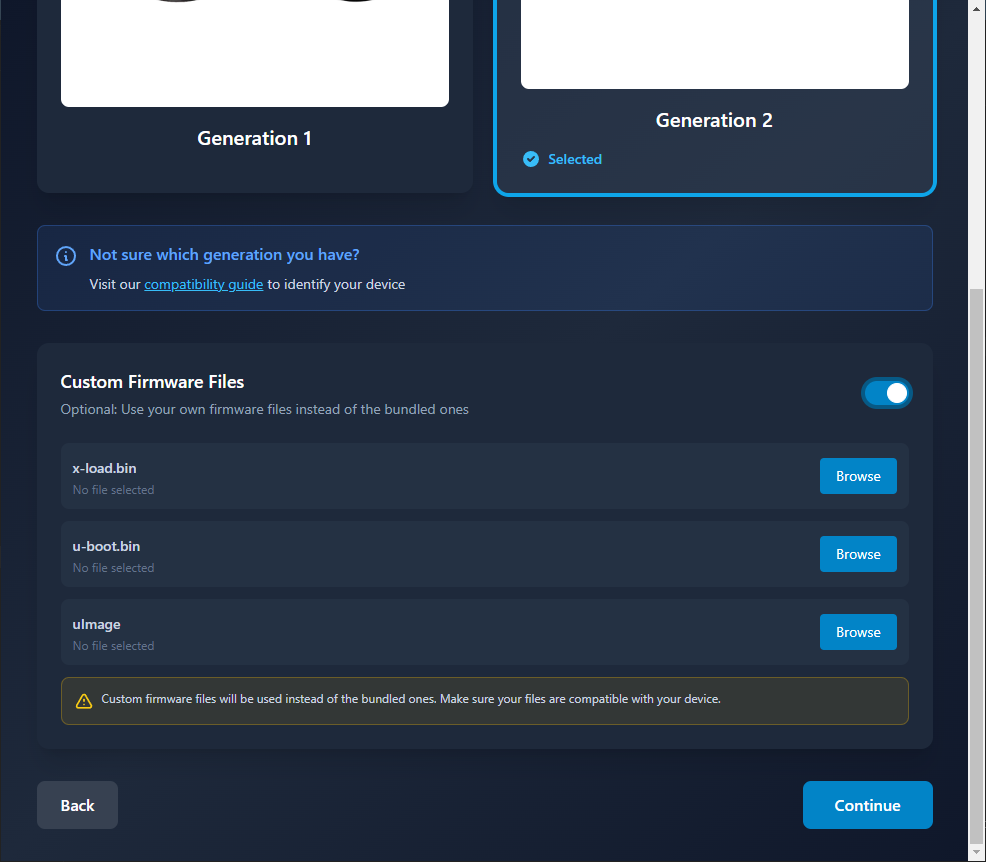 **Why use custom firmware?** There are a few reasons you might want to build your own:
* **Self-hosted server URL** — The default firmware points to the No Longer Evil hosted service. If you're self-hosting and want the thermostat to connect to your server out of the box — without needing the wizard — you can bake your server's URL directly into the firmware.
* **Custom root filesystem** — The firmware builder gives you access to the full root filesystem. You can add, remove, or modify scripts and files before the image is built, then flash that customized image to all of your Nest devices consistently.
To build your own firmware, clone the repo and use the Docker-based builder:
```bash theme={null}
git clone https://github.com/codykociemba/NoLongerEvil-Thermostat.git
cd NoLongerEvil-Thermostat/firmware/builder
./docker-build.sh --generation both --enable-root-access --yes
```
Copy the output into the installer before running it:
```bash theme={null}
cp firmware/builder/firmware/* firmware/installer/resources/firmware/
```
Then point the installer at your custom firmware using the option shown above.
The process differs between Generation 1 and Generation 2 devices. **Choose the instructions for your device:**
### Gen 2: Simple Reboot Method
Follow these steps carefully:
1. **Attach to back plate** - Connect your Nest to the wall back plate and wait 2–3 seconds — this arms the DFU trigger
2. **Remove from back plate** - Remove the Nest from its back plate/wall mount
3. **Connect via USB immediately** - Plug the Nest into your computer using a micro USB cable
4. **Make sure the No Longer Evil installer app is open** and on the flashing screen, waiting for the device
5. **Reboot the device** - Press and hold down on the display for 10-15 seconds until the device reboots
6. **DFU mode active** - Once it reboots, the device will enter DFU mode and the installer will recognize it and begin flashing
> **The back plate step is required every time.** The back plate contact arms the DFU trigger in the bootloader — without it, the device boots normally instead of entering flash mode. If the installer doesn't detect the device: unplug USB, re-seat on the back plate, wait 2–3 seconds, remove, plug USB again. Repeat the full sequence each attempt.
The firmware installer will automatically detect the device and flash the custom bootloader (x-load, u-boot) and kernel (uImage).
**Why use custom firmware?** There are a few reasons you might want to build your own:
* **Self-hosted server URL** — The default firmware points to the No Longer Evil hosted service. If you're self-hosting and want the thermostat to connect to your server out of the box — without needing the wizard — you can bake your server's URL directly into the firmware.
* **Custom root filesystem** — The firmware builder gives you access to the full root filesystem. You can add, remove, or modify scripts and files before the image is built, then flash that customized image to all of your Nest devices consistently.
To build your own firmware, clone the repo and use the Docker-based builder:
```bash theme={null}
git clone https://github.com/codykociemba/NoLongerEvil-Thermostat.git
cd NoLongerEvil-Thermostat/firmware/builder
./docker-build.sh --generation both --enable-root-access --yes
```
Copy the output into the installer before running it:
```bash theme={null}
cp firmware/builder/firmware/* firmware/installer/resources/firmware/
```
Then point the installer at your custom firmware using the option shown above.
The process differs between Generation 1 and Generation 2 devices. **Choose the instructions for your device:**
### Gen 2: Simple Reboot Method
Follow these steps carefully:
1. **Attach to back plate** - Connect your Nest to the wall back plate and wait 2–3 seconds — this arms the DFU trigger
2. **Remove from back plate** - Remove the Nest from its back plate/wall mount
3. **Connect via USB immediately** - Plug the Nest into your computer using a micro USB cable
4. **Make sure the No Longer Evil installer app is open** and on the flashing screen, waiting for the device
5. **Reboot the device** - Press and hold down on the display for 10-15 seconds until the device reboots
6. **DFU mode active** - Once it reboots, the device will enter DFU mode and the installer will recognize it and begin flashing
> **The back plate step is required every time.** The back plate contact arms the DFU trigger in the bootloader — without it, the device boots normally instead of entering flash mode. If the installer doesn't detect the device: unplug USB, re-seat on the back plate, wait 2–3 seconds, remove, plug USB again. Repeat the full sequence each attempt.
The firmware installer will automatically detect the device and flash the custom bootloader (x-load, u-boot) and kernel (uImage).
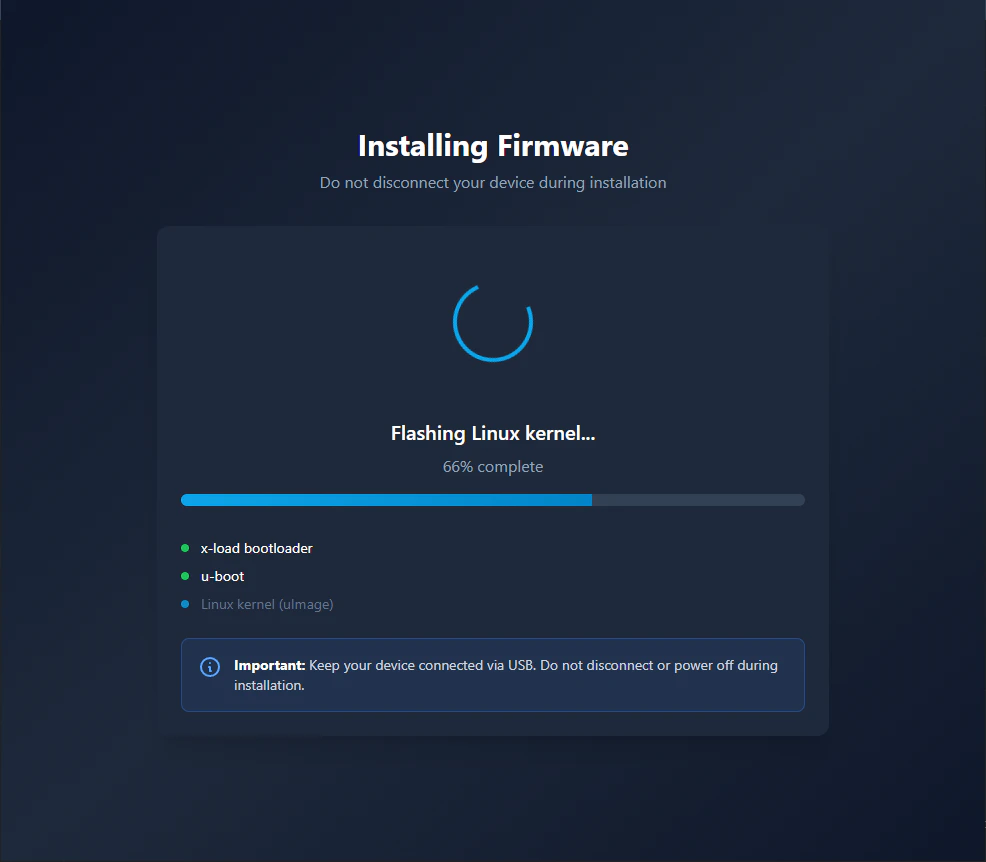 **Flashing in progress** — The installer is writing the bootloader and kernel to the device. Do not unplug the USB cable until it completes.
**If it stalls or fails:** Unplug USB, repeat the full back plate sequence (attach → 2–3 sec → remove → plug USB), and try again. If the installer never detects the device, check your USB cable (must be data-capable, not charge-only) and try a different USB port.
### Gen 1: Teardown & Contact Bridge Method
**Gen 1 requires physical disassembly.** This process involves opening the device and manually bridging internal contacts. Only proceed if you're comfortable with electronics teardown.
**Credit:** Gen 1 DFU mode instructions adapted from [guyman70718's cuckoo\_loader\_gen1 guide](https://github.com/guyman70718/cuckoo_loader_gen1).
#### Tools Needed:
* Phillips screwdriver or prying tool
* Metal tweezers or similar conductive object
* Mini USB cable
* Non-conductive object for battery removal
#### Teardown Steps:
Follow the [SparkFun Nest Thermostat Teardown Guide](https://learn.sparkfun.com/tutorials/nest-thermostat-teardown-/all) to open your Gen 1 thermostat.
You need to access the internal circuit board.
**Flashing in progress** — The installer is writing the bootloader and kernel to the device. Do not unplug the USB cable until it completes.
**If it stalls or fails:** Unplug USB, repeat the full back plate sequence (attach → 2–3 sec → remove → plug USB), and try again. If the installer never detects the device, check your USB cable (must be data-capable, not charge-only) and try a different USB port.
### Gen 1: Teardown & Contact Bridge Method
**Gen 1 requires physical disassembly.** This process involves opening the device and manually bridging internal contacts. Only proceed if you're comfortable with electronics teardown.
**Credit:** Gen 1 DFU mode instructions adapted from [guyman70718's cuckoo\_loader\_gen1 guide](https://github.com/guyman70718/cuckoo_loader_gen1).
#### Tools Needed:
* Phillips screwdriver or prying tool
* Metal tweezers or similar conductive object
* Mini USB cable
* Non-conductive object for battery removal
#### Teardown Steps:
Follow the [SparkFun Nest Thermostat Teardown Guide](https://learn.sparkfun.com/tutorials/nest-thermostat-teardown-/all) to open your Gen 1 thermostat.
You need to access the internal circuit board.
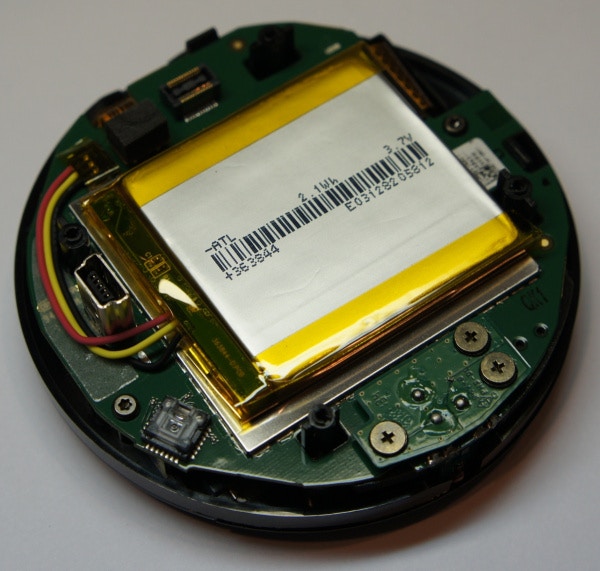 Unplug the battery by inserting your finger or a **NON-CONDUCTIVE object** underneath the battery wires. It lifts directly up.
**Important:** Do not use metal tools for this step.
Detach the metal shield from the corner to expose the circuit board components and contact points.
Unplug the battery by inserting your finger or a **NON-CONDUCTIVE object** underneath the battery wires. It lifts directly up.
**Important:** Do not use metal tools for this step.
Detach the metal shield from the corner to expose the circuit board components and contact points.
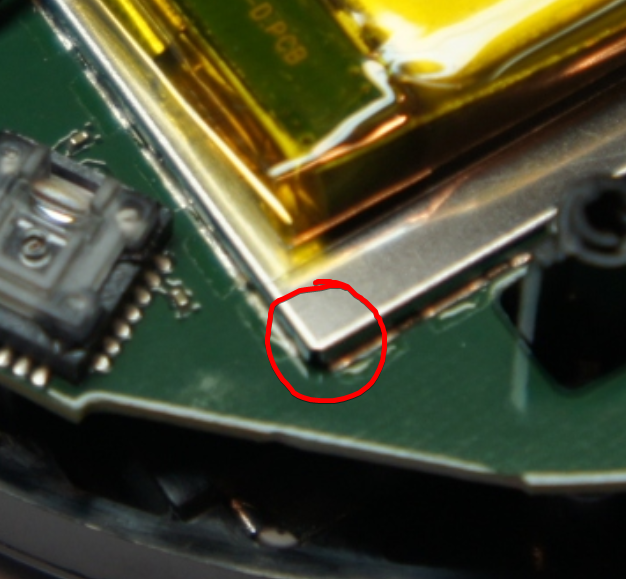 Reconnect the battery while keeping the shield removed.
**Note:** The device will not boot without a battery connected.
Ensure:
* Battery is reconnected
* Screen is off
* The **NoLongerEvil installer app is open** and waiting on your computer
* Mini USB cable is ready but not yet connected
Using metal tweezers or a conductive tool, **bridge the black and yellow resistor contacts** shown in the image below:
Reconnect the battery while keeping the shield removed.
**Note:** The device will not boot without a battery connected.
Ensure:
* Battery is reconnected
* Screen is off
* The **NoLongerEvil installer app is open** and waiting on your computer
* Mini USB cable is ready but not yet connected
Using metal tweezers or a conductive tool, **bridge the black and yellow resistor contacts** shown in the image below:
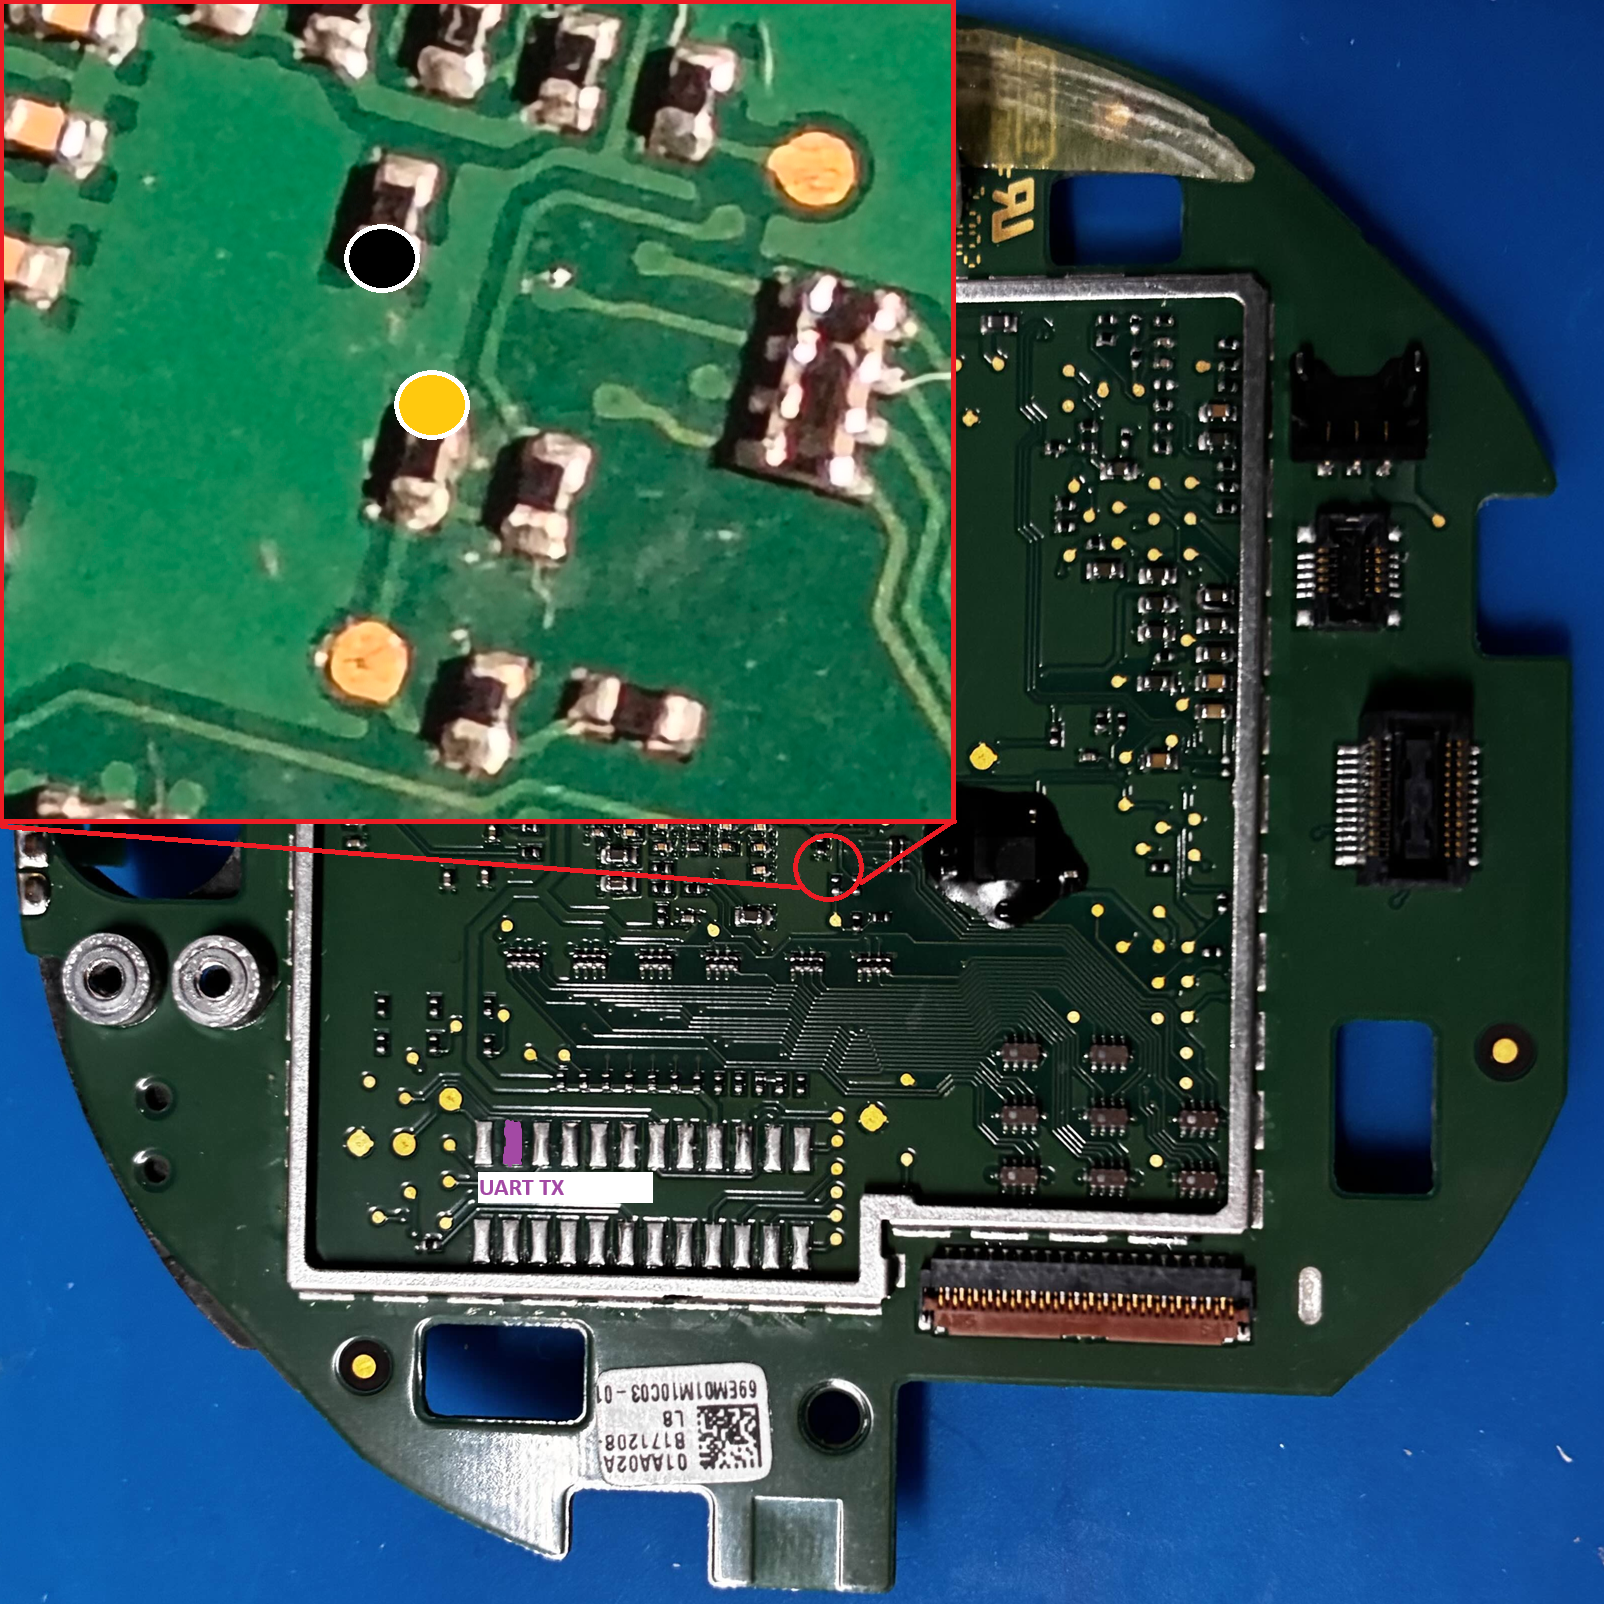 While holding the contacts bridged, connect the mini USB cable to the device.
The thermostat should boot into DFU mode and the installer will detect it.
Once detected, the firmware installer will automatically flash the custom bootloader and kernel.
Keep the device connected and don't disconnect until flashing completes.
**After successful flashing**, you can reassemble your Gen 1 thermostat by reversing the teardown steps. The device should boot normally with the new firmware.
While holding the contacts bridged, connect the mini USB cable to the device.
The thermostat should boot into DFU mode and the installer will detect it.
Once detected, the firmware installer will automatically flash the custom bootloader and kernel.
Keep the device connected and don't disconnect until flashing completes.
**After successful flashing**, you can reassemble your Gen 1 thermostat by reversing the teardown steps. The device should boot normally with the new firmware.
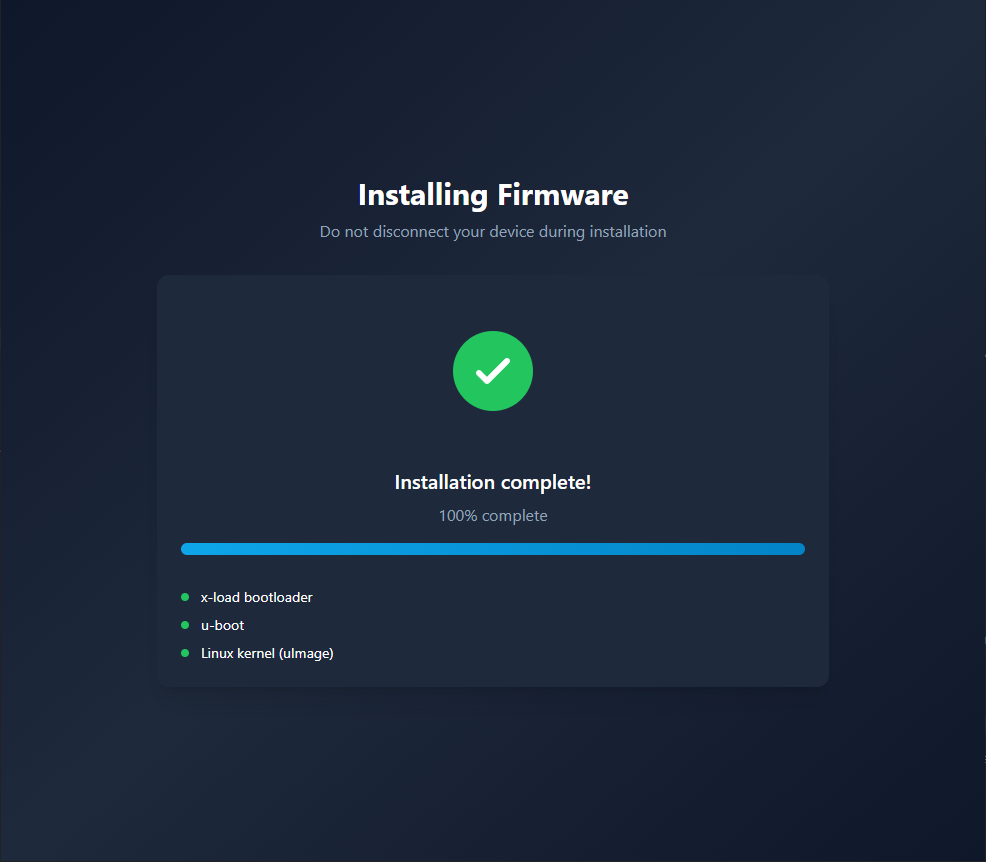 **Firmware flashed successfully** — The bootloader and kernel have been written to the device. Keep the USB cable connected — the device will now begin booting into the new firmware.
**If flashing failed mid-way:** Unplug and repeat the back plate sequence, then re-run the installer. A partial flash will not permanently damage the device — the DFU bootloader is always recoverable.
***
## Step 4: Wait for Boot
Keep the device plugged in via USB and wait for it to complete its boot sequence — this may take 3–4 minutes. When fully booted, you should see the default Nest temperature screen.
**Do not disconnect or power off the device during this time.**
***
## Step 5: Complete the Wizard
**Once the device has booted, the installer wizard takes over automatically.**
The wizard will guide you through:
* Establishing an SSH connection to the thermostat
* Configuring SSH access (disable or change the default password)
* Discovering your Home Assistant instance (optional)
* Discovering and registering your Nest device
Follow the on-screen wizard prompts. Once the wizard finishes, continue to
Steps 6 and 7 below to register your account and link your device to the dashboard.
**Firmware flashed successfully** — The bootloader and kernel have been written to the device. Keep the USB cable connected — the device will now begin booting into the new firmware.
**If flashing failed mid-way:** Unplug and repeat the back plate sequence, then re-run the installer. A partial flash will not permanently damage the device — the DFU bootloader is always recoverable.
***
## Step 4: Wait for Boot
Keep the device plugged in via USB and wait for it to complete its boot sequence — this may take 3–4 minutes. When fully booted, you should see the default Nest temperature screen.
**Do not disconnect or power off the device during this time.**
***
## Step 5: Complete the Wizard
**Once the device has booted, the installer wizard takes over automatically.**
The wizard will guide you through:
* Establishing an SSH connection to the thermostat
* Configuring SSH access (disable or change the default password)
* Discovering your Home Assistant instance (optional)
* Discovering and registering your Nest device
Follow the on-screen wizard prompts. Once the wizard finishes, continue to
Steps 6 and 7 below to register your account and link your device to the dashboard.
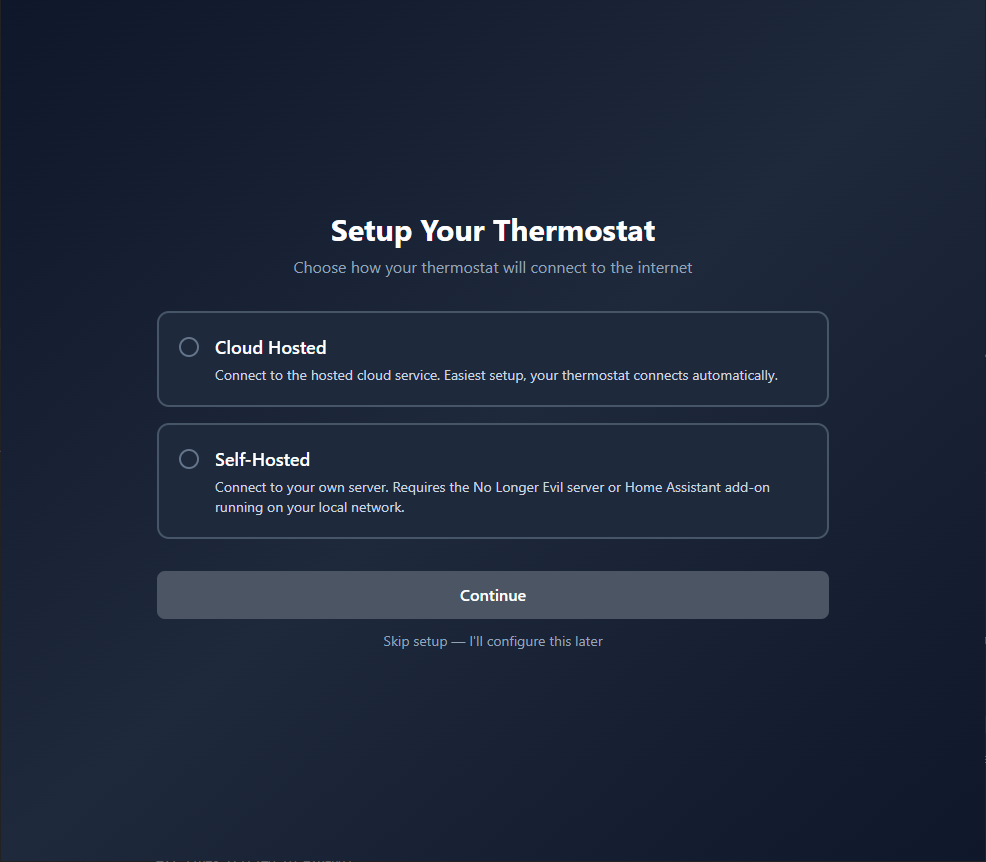 **Choose hosting mode** — Select **Cloud Hosted** to use the No Longer Evil managed service (recommended for most users). Select **Self-Hosted** only if you have already set up your own NLE server. If you haven't set up a server yet and pick Self-Hosted, the wizard will not be able to connect — go back and choose Cloud Hosted, or set up your server first.
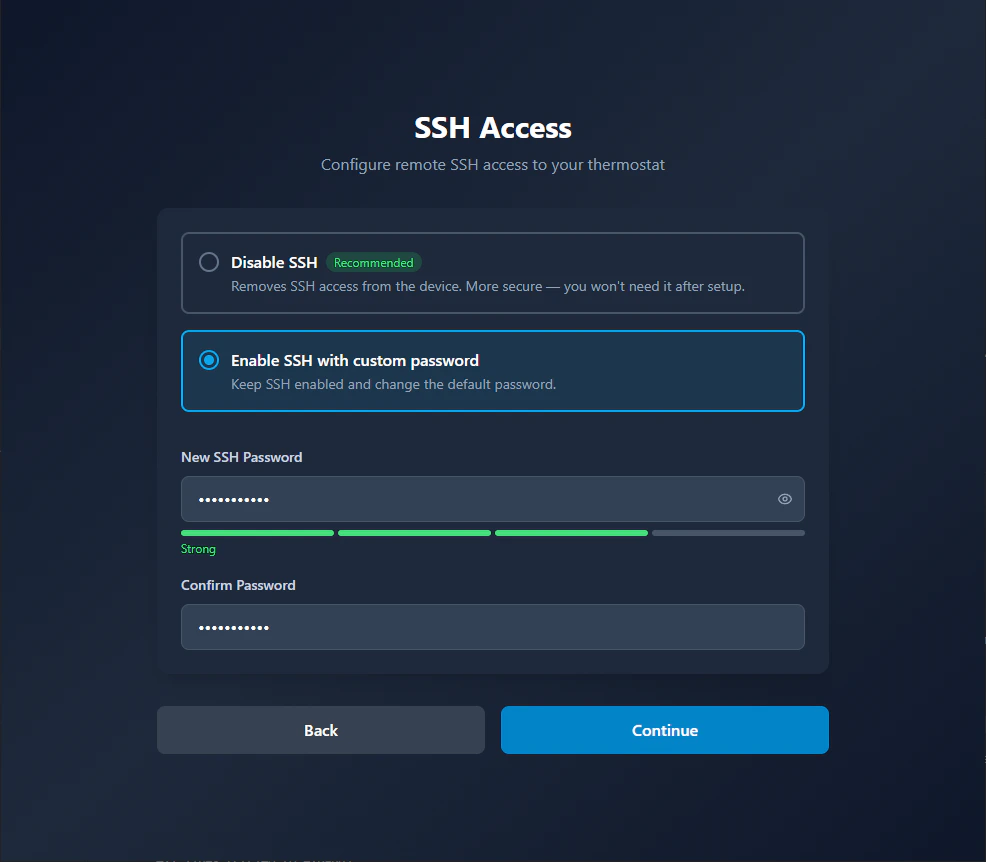
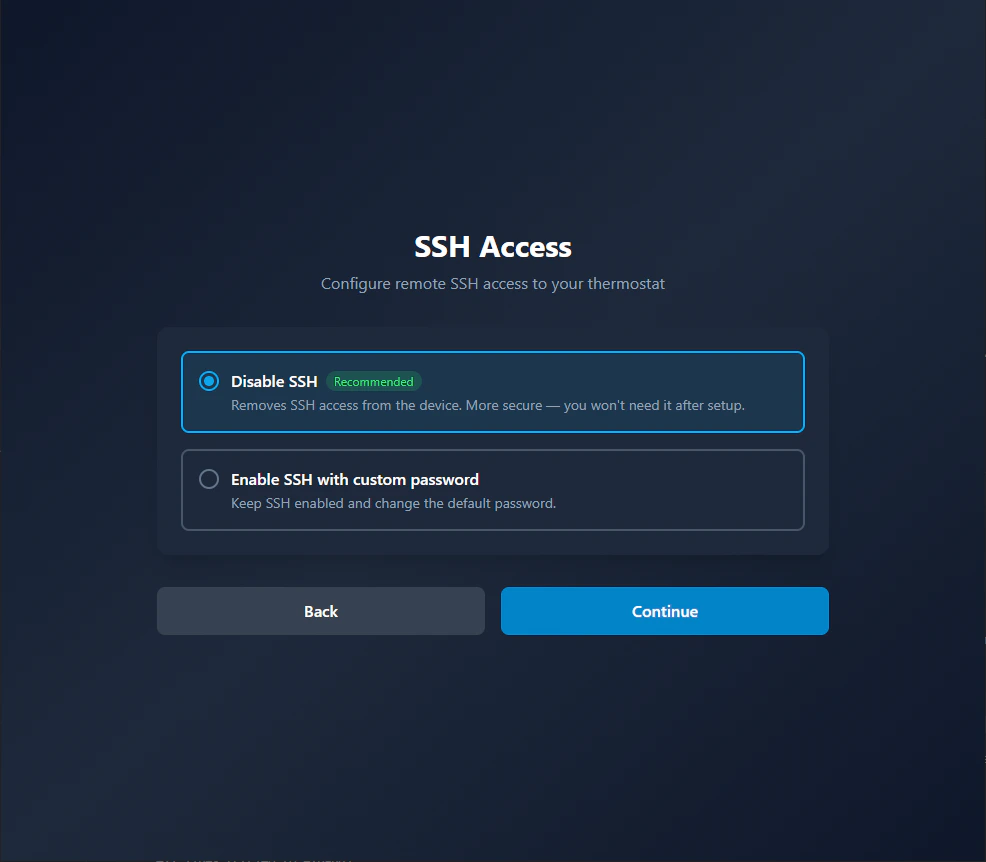 **SSH connection** — The wizard connects to the thermostat over SSH to configure it. The device must still be connected via USB and should have booted into the new firmware by now.
**If SSH fails:** Make sure the USB cable is still plugged in and the device has finished booting (when fully booted, you should see the default Nest temperature screen). If you see a connection timeout, unplug and replug the USB cable, wait 30 seconds, and click Retry.
If you choose to keep SSH enabled, this screen lets you change the default SSH password from `nolongerevil` to a password of your choice. This is recommended if your thermostat is on a network you don't fully control. You can SSH into the device at any time with `ssh root@[THERMOSTAT-IP]`.
**SSH connection** — The wizard connects to the thermostat over SSH to configure it. The device must still be connected via USB and should have booted into the new firmware by now.
**If SSH fails:** Make sure the USB cable is still plugged in and the device has finished booting (when fully booted, you should see the default Nest temperature screen). If you see a connection timeout, unplug and replug the USB cable, wait 30 seconds, and click Retry.
If you choose to keep SSH enabled, this screen lets you change the default SSH password from `nolongerevil` to a password of your choice. This is recommended if your thermostat is on a network you don't fully control. You can SSH into the device at any time with `ssh root@[THERMOSTAT-IP]`.
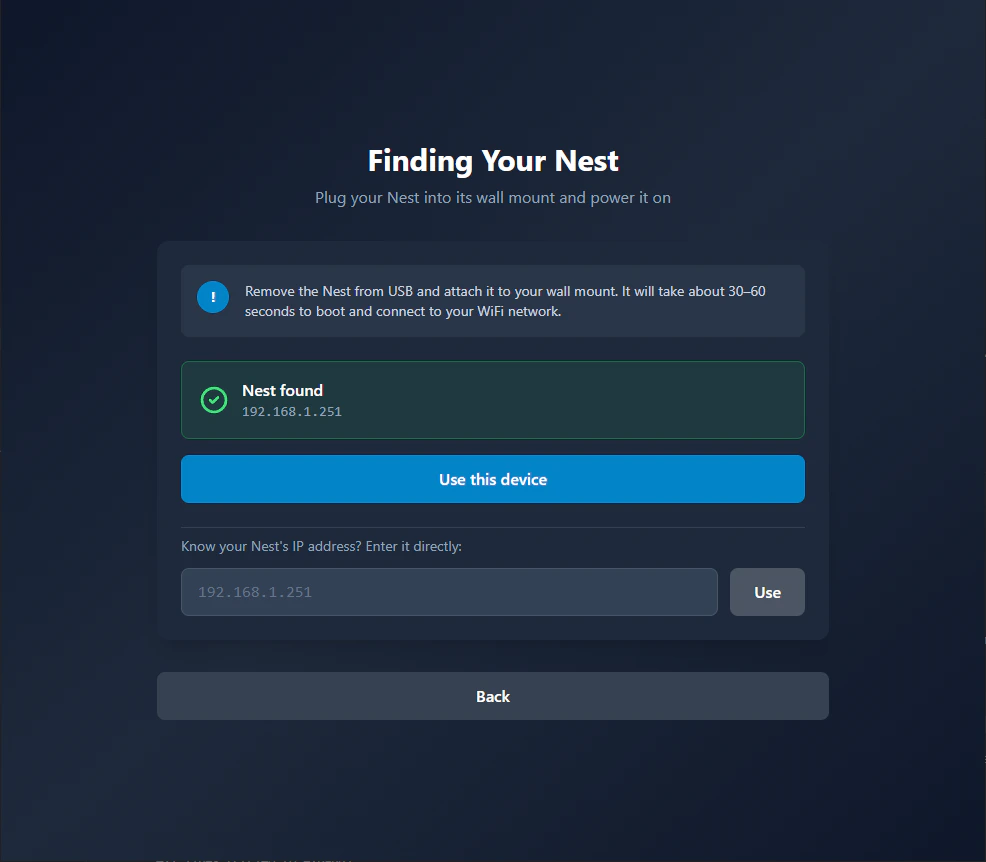 **Finding your Nest on the network** — The wizard scans your local network to locate the thermostat after it connects to WiFi. The device needs to be on the same network as your computer.
**If the Nest isn't found:** Check the WiFi credentials on the Nest device itself and confirm it shows as connected. The scan may take up to 60 seconds — wait for it to complete before retrying. Alternatively, if you know the thermostat's IP address, you can enter it manually and click **Use**. If it still fails, see the [Troubleshooting guide](/hosted/troubleshooting).
**Finding your Nest on the network** — The wizard scans your local network to locate the thermostat after it connects to WiFi. The device needs to be on the same network as your computer.
**If the Nest isn't found:** Check the WiFi credentials on the Nest device itself and confirm it shows as connected. The scan may take up to 60 seconds — wait for it to complete before retrying. Alternatively, if you know the thermostat's IP address, you can enter it manually and click **Use**. If it still fails, see the [Troubleshooting guide](/hosted/troubleshooting).
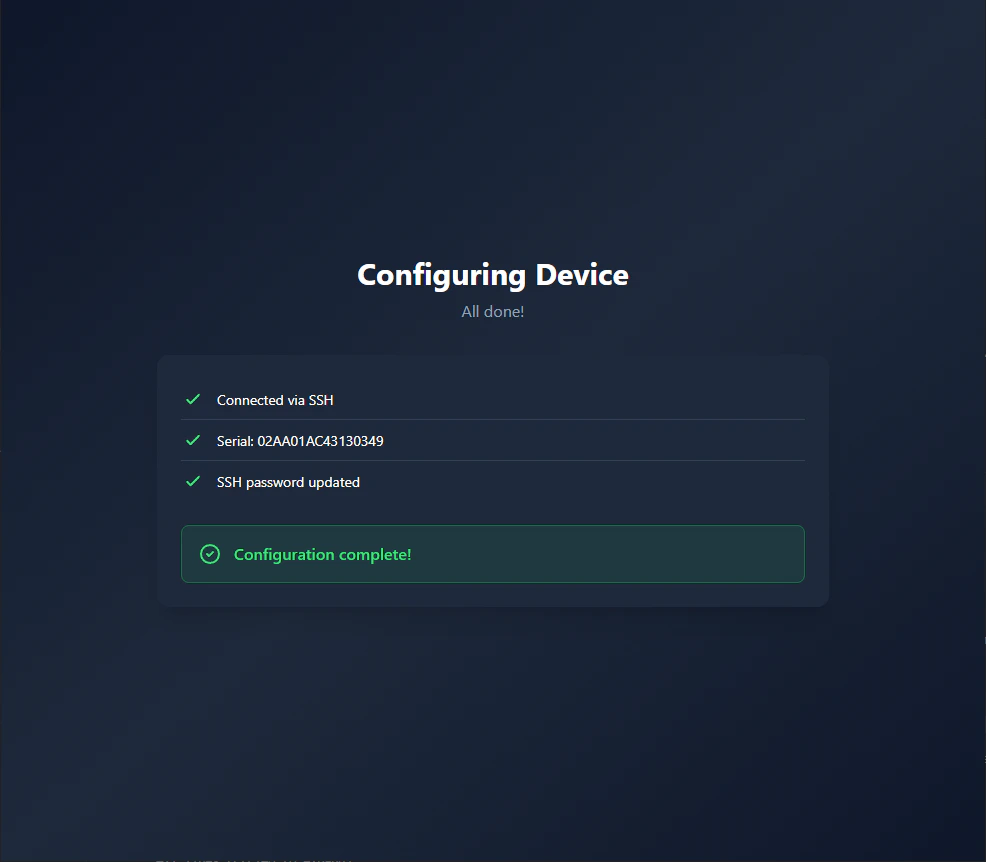 **Configuring device** — The wizard is writing the server URL and account settings to the thermostat. Do not unplug or power off the device during this step.
**If provisioning fails:** Check your internet connection and try again. If it fails repeatedly, see the [Troubleshooting guide](/hosted/troubleshooting) for SSH-based manual configuration.
**Configuring device** — The wizard is writing the server URL and account settings to the thermostat. Do not unplug or power off the device during this step.
**If provisioning fails:** Check your internet connection and try again. If it fails repeatedly, see the [Troubleshooting guide](/hosted/troubleshooting) for SSH-based manual configuration.
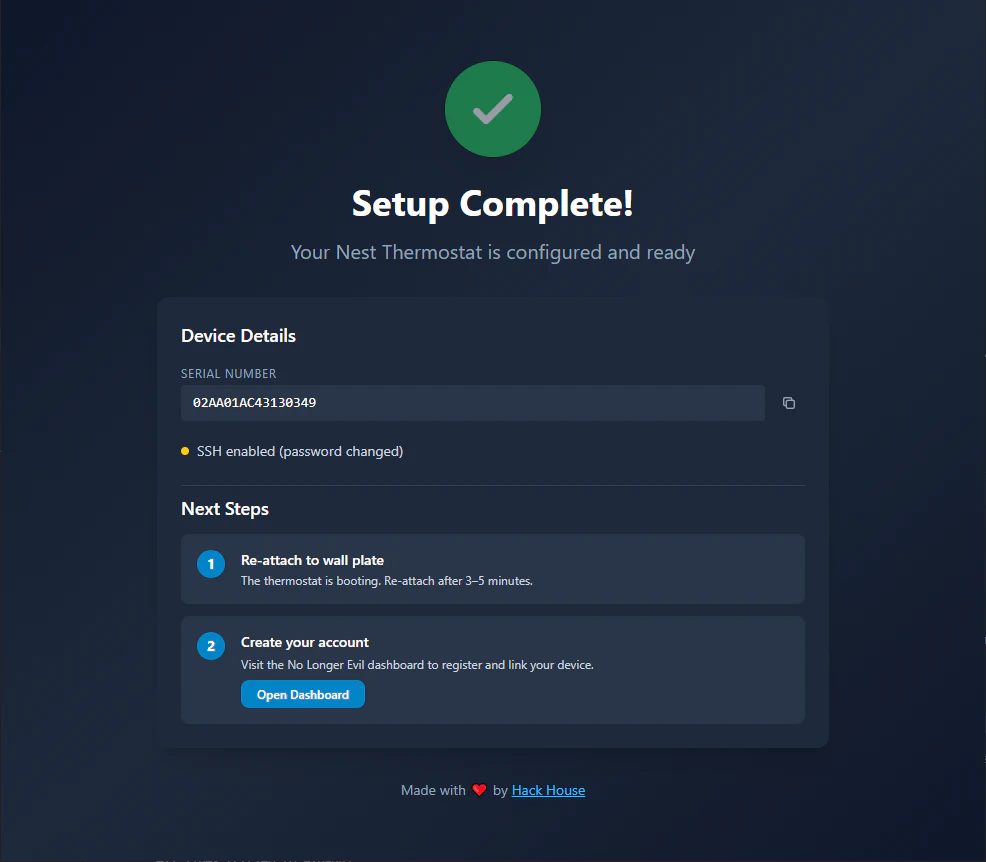 **Setup complete** — The thermostat is configured and connected. Continue to Steps 6 and 7 below to register your account and link the device to your dashboard.
***
## Step 6: Register Account
Once the device has fully rebooted:
1. Visit **[https://nolongerevil.com](https://nolongerevil.com)** in your web browser
2. **Register an account** (or sign in if you already have one)
3. Navigate to your **Dashboard**
You will see a "No devices" screen that prompts you for an entry code.
***
## Step 7: Link Your Device
To link your Nest device to your No Longer Evil account:
1. On your Nest device, navigate to: **Settings → Nest App → Get Entry Code**
2. The device will display a unique entry code
3. Enter this code on the No Longer Evil dashboard
4. Your device is now linked and ready to use!
***
## Step 8: Reinstall on Wall
Once everything is working:
1. Align the Nest with the backplate on the wall
2. Push gently until it clicks into place
3. The device will reconnect to HVAC power and charge
***
## 🎉 Success!
Your Nest Thermostat is now running No Longer Evil and connected to your account!
***
## Having trouble?
See the [Troubleshooting guide →](/hosted/troubleshooting)
***
## Credits & Acknowledgments
This project builds upon the excellent work of several security researchers and developers:
* **[grant-h](https://github.com/grant-h) / [ajb142](https://github.com/ajb142)** - [omap\_loader](https://github.com/ajb142/omap_loader), the USB bootloader tool used to flash OMAP devices
* **[exploiteers (GTVHacker)](https://github.com/exploiteers)** - Original research and development of the [Nest DFU attack](https://github.com/exploiteers/NestDFUAttack), which demonstrated the ability to flash custom firmware to Nest devices gen 1 & gen 2
* **[guyman70718](https://github.com/guyman70718)** - [cuckoo\_loader\_gen1](https://github.com/guyman70718/cuckoo_loader_gen1) guide and teardown documentation for Gen 1 DFU mode access
* **[FULU](https://bounties.fulu.org/)** and all bounty backers - For funding the [Nest Learning Thermostat Gen 1/2 bounty](https://bounties.fulu.org/bounties/nest-learning-thermostat-gen-1-2) and supporting the right-to-repair movement
Without their groundbreaking research, open-source contributions, and advocacy for device ownership rights, this work would not be possible. Thank you!
***
Join our Discord community or open a GitHub issue for assistance
**Setup complete** — The thermostat is configured and connected. Continue to Steps 6 and 7 below to register your account and link the device to your dashboard.
***
## Step 6: Register Account
Once the device has fully rebooted:
1. Visit **[https://nolongerevil.com](https://nolongerevil.com)** in your web browser
2. **Register an account** (or sign in if you already have one)
3. Navigate to your **Dashboard**
You will see a "No devices" screen that prompts you for an entry code.
***
## Step 7: Link Your Device
To link your Nest device to your No Longer Evil account:
1. On your Nest device, navigate to: **Settings → Nest App → Get Entry Code**
2. The device will display a unique entry code
3. Enter this code on the No Longer Evil dashboard
4. Your device is now linked and ready to use!
***
## Step 8: Reinstall on Wall
Once everything is working:
1. Align the Nest with the backplate on the wall
2. Push gently until it clicks into place
3. The device will reconnect to HVAC power and charge
***
## 🎉 Success!
Your Nest Thermostat is now running No Longer Evil and connected to your account!
***
## Having trouble?
See the [Troubleshooting guide →](/hosted/troubleshooting)
***
## Credits & Acknowledgments
This project builds upon the excellent work of several security researchers and developers:
* **[grant-h](https://github.com/grant-h) / [ajb142](https://github.com/ajb142)** - [omap\_loader](https://github.com/ajb142/omap_loader), the USB bootloader tool used to flash OMAP devices
* **[exploiteers (GTVHacker)](https://github.com/exploiteers)** - Original research and development of the [Nest DFU attack](https://github.com/exploiteers/NestDFUAttack), which demonstrated the ability to flash custom firmware to Nest devices gen 1 & gen 2
* **[guyman70718](https://github.com/guyman70718)** - [cuckoo\_loader\_gen1](https://github.com/guyman70718/cuckoo_loader_gen1) guide and teardown documentation for Gen 1 DFU mode access
* **[FULU](https://bounties.fulu.org/)** and all bounty backers - For funding the [Nest Learning Thermostat Gen 1/2 bounty](https://bounties.fulu.org/bounties/nest-learning-thermostat-gen-1-2) and supporting the right-to-repair movement
Without their groundbreaking research, open-source contributions, and advocacy for device ownership rights, this work would not be possible. Thank you!
***
Join our Discord community or open a GitHub issue for assistance