> ## Documentation Index
> Fetch the complete documentation index at: https://docs.nolongerevil.com/llms.txt
> Use this file to discover all available pages before exploring further.
# Device Compatibility
> Check if your Nest Thermostat is compatible with No Longer Evil
## Supported Devices
**Fully Supported**
Requires device teardown
**Fully Supported**
Simple USB connection
**In Development**
Not currently supported
**Both Generation 1 and Generation 2 thermostats are fully supported.**
Gen 2 devices are easier to flash (simple USB connection), while Gen 1 requires device disassembly and contact bridging to enter DFU mode.
## How to Identify Your Nest Thermostat
Not sure which generation you have? Use this guide to identify your Nest Thermostat model.
### Visual Identification
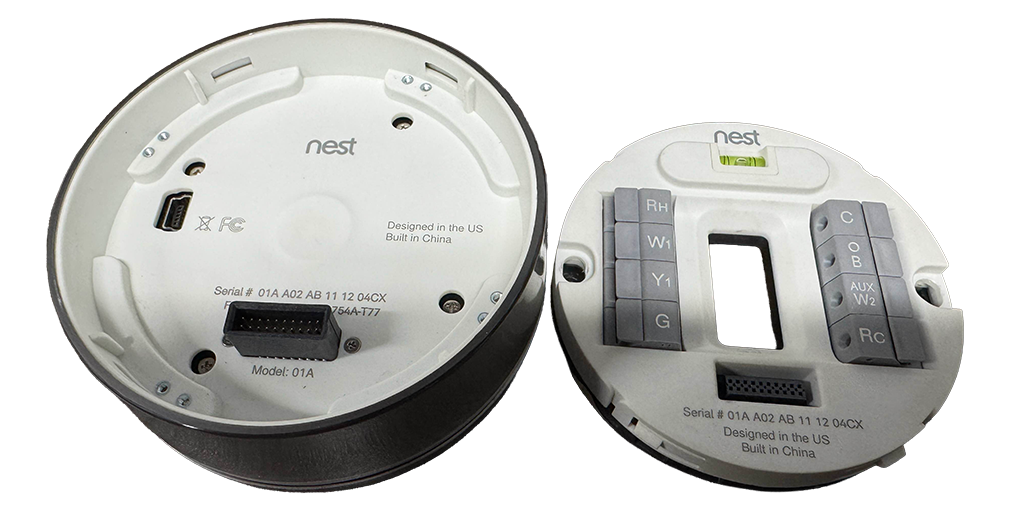
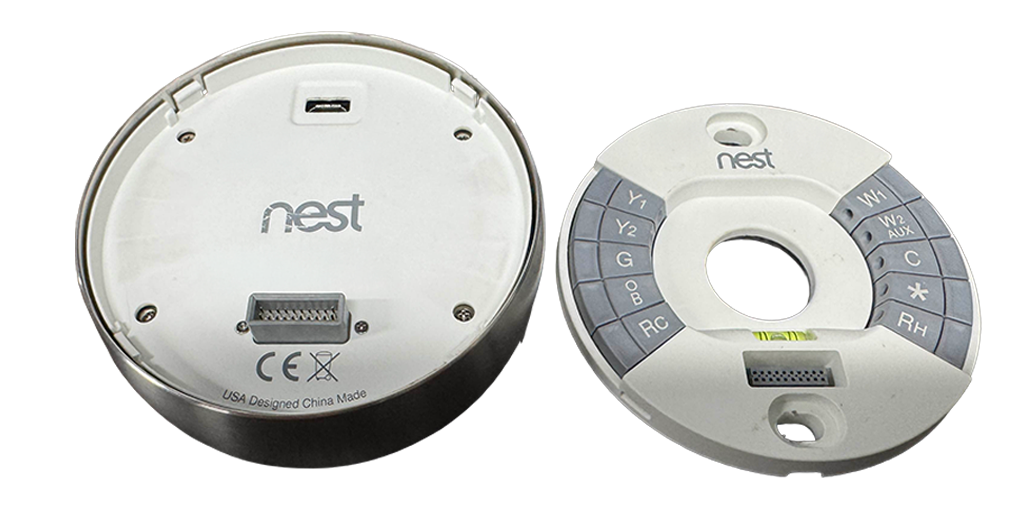
Here's what each generation looks like:
**Key Features:**
* Rotating ring with metallic finish
* 8 wire connectors on backplate
* Yellow/Green level bubble
**Key Features:**
* Similar rotating ring design
* 8-10 wire connectors on backplate
* Yellow/Green level bubble
### Generation 1 Thermostat
 ### Generation 2 Thermostat
 ### Method 1: Check the Backplate
Remove your Nest from the wall mount and look at the backplate for these identifying features:
**Yellow/Green** → Gen 1 or Gen 2 ✅
**Blue** → Gen 3 ❌
**8 connectors** → Gen 1 ✅
**8-10 connectors** → Gen 2 ✅
**10 connectors** → Gen 3 ❌
### Method 2: Check Settings Menu
This is the most reliable method:
Press on your Nest display and navigate to **Settings**
Navigate to **Settings → Technical Info**
Look for the "Display model" field. The first digit tells you the generation:
* **1x** (e.g., 1.12) → Generation 1 ✅
* **2x** (e.g., 2.8) → Generation 2 ✅
* **3x** (e.g., 3.7) → Generation 3 ❌
**Wondering why No Longer Evil exists?** Learn about [how Google is intentionally blocking older Nest devices](/why-google-blocks) even though they're fully functional.
## Generation-Specific Installation Requirements
**Gen 1 thermostats are fully supported** but require device disassembly to enter DFU mode.
You'll need:
* Phillips screwdriver or similar tool
* Metal tweezers or similar conductive object
* Patience for careful disassembly
Gen 1 installation involves opening the device, removing the battery, bridging specific contacts, and reconnecting while the firmware loader runs. Full teardown instructions are provided in the installation guide.
Gen 1 installation is more complex and requires physical device modification. Only proceed if you're comfortable with electronics teardown.
**Gen 2 thermostats are the easiest to flash** - just connect via USB and run the installer.
You'll need:
* Micro USB cable
* No disassembly required
Gen 2 is the recommended option for beginners due to its simple plug-and-play installation process.
**Support is in development.** Generation 3 uses different hardware architecture and will require more extensive development.
If you have Gen 3 hardware and want to help with development, please reach out via [GitHub](https://github.com/codykociemba/NoLongerEvil-Thermostat) or [Discord](https://discord.gg/AffeGaJ5XS).
## Additional Requirements
Beyond having a Generation 1 or Generation 2 thermostat, you'll need:
**Operating System**: Linux (recommended) or macOS
**Purpose**: To run the firmware installer
⚠️ Windows is NOT supported (including WSL)
**Type**: Mini USB (Gen 1) or Micro USB (Gen 2)
**Purpose**: Connect thermostat to computer for firmware flashing
**Level**: At least 50% charge
**Purpose**: Ensure device stays powered during flashing
**Speed**: Standard broadband
**Purpose**: Download firmware & access dashboard
## Next Steps
Decide between hosted service (easy) or self-hosted (advanced)
Jump straight to the recommended hosted setup guide
### Method 1: Check the Backplate
Remove your Nest from the wall mount and look at the backplate for these identifying features:
**Yellow/Green** → Gen 1 or Gen 2 ✅
**Blue** → Gen 3 ❌
**8 connectors** → Gen 1 ✅
**8-10 connectors** → Gen 2 ✅
**10 connectors** → Gen 3 ❌
### Method 2: Check Settings Menu
This is the most reliable method:
Press on your Nest display and navigate to **Settings**
Navigate to **Settings → Technical Info**
Look for the "Display model" field. The first digit tells you the generation:
* **1x** (e.g., 1.12) → Generation 1 ✅
* **2x** (e.g., 2.8) → Generation 2 ✅
* **3x** (e.g., 3.7) → Generation 3 ❌
**Wondering why No Longer Evil exists?** Learn about [how Google is intentionally blocking older Nest devices](/why-google-blocks) even though they're fully functional.
## Generation-Specific Installation Requirements
**Gen 1 thermostats are fully supported** but require device disassembly to enter DFU mode.
You'll need:
* Phillips screwdriver or similar tool
* Metal tweezers or similar conductive object
* Patience for careful disassembly
Gen 1 installation involves opening the device, removing the battery, bridging specific contacts, and reconnecting while the firmware loader runs. Full teardown instructions are provided in the installation guide.
Gen 1 installation is more complex and requires physical device modification. Only proceed if you're comfortable with electronics teardown.
**Gen 2 thermostats are the easiest to flash** - just connect via USB and run the installer.
You'll need:
* Micro USB cable
* No disassembly required
Gen 2 is the recommended option for beginners due to its simple plug-and-play installation process.
**Support is in development.** Generation 3 uses different hardware architecture and will require more extensive development.
If you have Gen 3 hardware and want to help with development, please reach out via [GitHub](https://github.com/codykociemba/NoLongerEvil-Thermostat) or [Discord](https://discord.gg/AffeGaJ5XS).
## Additional Requirements
Beyond having a Generation 1 or Generation 2 thermostat, you'll need:
**Operating System**: Linux (recommended) or macOS
**Purpose**: To run the firmware installer
⚠️ Windows is NOT supported (including WSL)
**Type**: Mini USB (Gen 1) or Micro USB (Gen 2)
**Purpose**: Connect thermostat to computer for firmware flashing
**Level**: At least 50% charge
**Purpose**: Ensure device stays powered during flashing
**Speed**: Standard broadband
**Purpose**: Download firmware & access dashboard
## Next Steps
Decide between hosted service (easy) or self-hosted (advanced)
Jump straight to the recommended hosted setup guide